為何我的自訂 WordPress 外掛程式中 rest_api_init 無法運作?
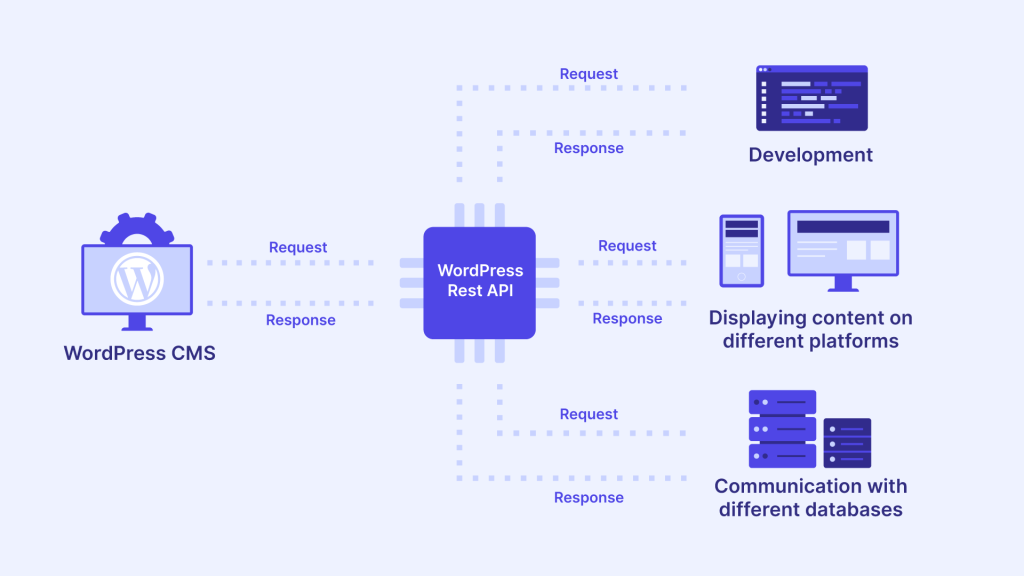
遇到以下問題 rest_api_init 在您的自訂 WordPress 外掛中無法運作可能會相當令人沮喪,尤其是當看起來一切都應該配置正確時。在這篇文章中,我們將探討以下可能的原因 rest_api_init 可能無法運作、檢視常見的陷阱,並討論最佳實務,以確保您的自訂 REST API 路由能順暢運作。這是專為希望在 WordPress 中建立強大自訂 API 的開發人員所設計的技術深究。

瞭解 rest_api_init 及其在 WordPress 中的作用
的 rest_api_init action 鉤子是用來新增自訂路由和端點到 WordPress REST API。它在 REST API 伺服器初始化時執行,通常用來註冊新的 REST API 路由。如果您的自訂端點無法如預期般運作,通常是由於錯誤設定或不當使用 rest_api_init.瞭解鉤子的生命週期及其在 WordPress 中的角色,對於成功擴充 API 是非常重要的。
rest_api_init 無法運作的常見原因
讓我們來分析一下最常見的原因 rest_api_init 在您的自訂 WordPress 外掛中可能無法運作,並針對每個問題提供實用的解決方案。
1.掛鉤位置和時間問題
最常見的原因是 rest_api_init 不工作的原因是掛鉤位置不正確。的 rest_api_init 動作鉤需要在 WordPress 初始化所有元件之後呼叫。一般而言,您應該在主外掛檔案中加入這個動作,或是在單獨的初始化函式中加入,確保它是在 WordPress 核心和任何相依外掛完全載入後才被呼叫。
解決方案: 請確定您使用以下方式註冊自訂路由 rest_api_init 在正確的上下文中:
add_action('rest_api_init', 'register_custom_api_routes');

function register_custom_api_routes() {
    register_rest_route('myplugin/v1', '/content/', array(
        'methods' => 'GET'、
        'callback' => 'get_custom_content'、
        'permission_callback' => '__return_true', // 設定適當的權限
    ));
}
說明:
add_action('rest_api_init', 'register_custom_api_routes');- 此行掛接到rest_api_init以在 REST API 初始化後註冊我們的自訂路由。register_rest_route('myplugin/v1', '/content/', ...)- 此功能會註冊新的 REST API 路由。命名空間 ('myplugin/v1') 有助於唯一識別路由,避免與其他外掛產生衝突。'permission_callback' => '__return_true'- 這個回呼會授予任何存取端點的人權限。對於實際應用程式,請以適當的使用者能力檢查來取代,以確保安全性。
將此程式碼放置在主外掛程式檔案中,或是在載入所有外掛程式後執行的函式中,例如 plugins_loaded.掛勾位置不正確可能導致路由無法正確登錄。
2.外掛程式或主題衝突
另一個常見原因是 rest_api_init 無法正常運作可能是因為與其他也註冊路由的外掛程式或主題產生衝突。如果兩個外掛程式嘗試註冊相同的端點,或主題有類似的路由,就可能會產生衝突,導致您的自訂端點無法正常運作。
解決方案: 使用唯一的命名空間前綴以避免衝突。REST API 路由中的命名空間旨在防止此類衝突。例如
register_rest_route('myplugin/v1', '/custom-content/', array(
    'methods' => 'GET'、
    'callback' => 'get_custom_content'、
    'permission_callback' => '__return_true'、
));
說明:
- 的
'myplugin/v1'命名空間有助於唯一識別路由,防止命名衝突。 - 在停用衝突外掛程式的情況下進行測試,有助於隔離特定外掛程式是否造成問題。
3.許可證結構設定不正確
WordPress REST API 依賴永久連結結構才能正常運作。如果您的網站使用普通的永久連結,REST API 路由可能無法使用或無法如預期般運作。
解決方案: 更新您的標題連結結構,請導航至 設定 > 永久連結 中的 WordPress 管理面板。選擇「Plain」以外的任何結構,然後儲存變更。這會刷新重寫規則,並確保您的 REST API 路由可被存取。
4.快取問題
快取外掛程式或伺服器層級的快取會干擾 REST API 端點的正常運作。啟用快取功能時,路由的變更可能無法立即反映,導致您覺得 rest_api_init 無法運作。
解決方案: 清除任何快取機制,包括伺服器端(例如 Varnish 或 Nginx 快取)和 WordPress 層級的快取外掛。在開發環境中,請考慮完全停用快取,以避免在開發和測試期間發生問題。
5.不正確的權限回呼
的 permission_callback 參數用於判斷使用者是否可以存取 REST API 端點。如果此回調函式回傳 false 或遇到錯誤,則無法存取端點,給人的印象是 rest_api_init 沒有用。
解決方案: 驗證 permission_callback 函數已正確執行,並返回 真 如果允許存取。例如
function get_custom_content_permission() {
    return current_user_can('read'); // 根據需要調整能力
}

add_action('rest_api_init', 'register_custom_api_routes');

function register_custom_api_routes() {
    register_rest_route('myplugin/v1', '/custom-content/', array(
        'methods' => 'GET'、
        'callback' => 'get_custom_content'、
        'permission_callback' => 'get_custom_content_permission'、
    ));
}
說明:
current_user_can('read')檢查目前使用者是否有適當的權限。請針對您的端點調整必要的能力。- 如果沒有所需權限的使用者嘗試存取端點,就會出現錯誤,這有助於保護您的 API。
6.調試工具與技術
如果沒有適當的工具,調試 REST API 問題可能會很具挑戰性。以下是一些調試方法 rest_api_init 可能無法運作:
- WordPress 除錯模式:啟用 WordPress 錯誤模式,加入
define('WP_DEBUG', true);在您的wp-config.php檔案。這可協助您找出外掛程式碼中可能會阻止rest_api_init無法正確發射。 - 使用 Postman 進行測試:Postman 是測試 REST API 端點的絕佳工具。要測試您的自訂路由,請傳送 GET 請求到您的端點 URL (例如、
http://yourdomain.com/wp-json/myplugin/v1/custom-content).這可協助您查看端點是否可存取,以及是否傳回預期的資料。- 逐步測試郵差:
- 開啟 Postman 並建立新的 GET 請求。
- 輸入您的 API 端點 URL (例如、
http://yourdomain.com/wp-json/myplugin/v1/custom-content). - 按一下「傳送」以啟動請求。
- 觀察回應狀態代碼和資料。200 OK 狀態表示成功,而 404 或 403 則表示路由未找到或權限錯誤等問題。
- 如果您的端點需要驗證,請包含必要的標頭,例如授權標記,以存取受限制的路由。
- 逐步測試郵差:
- WordPress REST API 控制台外掛程式:REST API Console 外掛程式可用於直接從管理面板與 WordPress REST API 進行互動。這有助於即時除錯和檢查您的自訂路由是否正確註冊。
- 用於命令列測試的 cURL:您也可以從命令列使用 cURL 來測試您的端點:
curl -X GET "http://yourdomain.com/wp-json/myplugin/v1/custom-content"說明: 此指令會向您的端點傳送 GET 請求。它可讓您驗證路由是否可存取,並排除任何網路層級的問題。請注意回應標頭和狀態代碼。

WPML 和 Polylang 的詳細外掛程式整合步驟
為了讓您的自訂 REST API 多語言化,您可能會使用 WPML 或 Polylang 等外掛程式。雖然這些外掛程式提供了全面的翻譯工具,但是將它們與自訂 REST API 路由正確整合需要特定的步驟。
WPML 整合
- 安裝 WPML 外掛程式:從 WordPress 套件庫或您在 WPML 網站的帳戶安裝並啟動 WPML 外掛程式。
- 切換語言上下文:使用
全球 $sitepress;和$sitepress->switch_lang($language);在您的回呼函數中,在查詢內容前設定語言上下文。 - 註冊 REST API 路由:確保您的路由正確處理
長參數,在傳回內容之前動態切換語言:function get_content_by_language($language) { global $sitepress; $sitepress->switch_lang($language); $args = array( 'post_type' => 'post', 'posts_per_page' => 5 ); $query = new WP_Query($args); return $query->posts; }說明: 此功能在查詢文章之前,使用 WPML 的 API 切換語言上下文。這可確保以所需語言取得內容。
Polylang 整合
- 安裝 Polylang:安裝並啟動 Polylang 外掛程式。
- 使用 pll_set_language() 設定語言:使用
pll_set_language($language);在您的 API 回調函式中設定語言上下文。 - 修改查詢以反映語言內容:確保在查詢內容時,語言設定為所需的值:
function get_content_by_language($language) { pll_set_language($language); $args = array( 'post_type' => 'post', 'posts_per_page' => 5 ); $query = new WP_Query($args); return $query->posts; }說明: 的pll_set_language($language)函式為內容查詢設定所需語言,確保傳回正確版本的內容。
真實世界範例:建立多語言部落格 API
讓我們建立一個簡單的多語言網誌 API,使用 rest_api_init.此 API 將支援使用 WPML 查詢不同語言的文章。
步驟 1:註冊 REST 路由
add_action('rest_api_init', 'register_multilingual_blog_routes');

function register_multilingual_blog_routes() {
    register_rest_route('myblog/v1', '/posts/', array(
        'methods' => 'GET'、
        'callback' => 'get_blog_posts_by_language'、
        'permission_callback' => '__return_true'、
    ));
}
步驟 2:定義回呼函式
function get_blog_posts_by_language($request) {
    $language = $request->get_param('lang');

    if (!$language) {
        return new WP_Error('no_language', 'Language parameter is required', array('status' => 400));
    }

    global $sitepress;
    $sitepress->switch_lang($language);

    $args = array(
        'post_type' => 'post'、
        'posts_per_page' => 5
    );

    $query = new WP_Query($args);

    if (empty($query->posts)) {
        return new WP_Error('no_posts', 'No posts found for the specified language', array('status' => 404));
    }

    return rest_ensure_response($query->posts);
}
說明:
- 本範例建立一個 REST API 端點
/wp-json/myblog/v1/posts/接受語言參數 (長). - 的
依語言取得部落格文章函數使用 WPML 切換語言上下文,並據此查詢文章。 - 包含適當的錯誤處理,以確保在找不到語言或文章時,端點會傳回有意義的回應。
總結
的 rest_api_init hook是擴充WordPress REST API的強大工具,但其正確實作需要仔細考慮時間、衝突、權限及除錯技術。透過確保您的鉤子放置正確、管理潛在衝突、瞭解永久連結的作用,以及使用強大的除錯方法,您可以確保您的自訂 REST API 端點有效運作。
此外,將 WPML 和 Polylang 等多語言外掛程式整合至您的自訂 API 需要特別注意細節,以確保應用正確的語言上下文。在開發擴充 REST API 的自訂 WordPress 外掛時,遵循這些最佳實務與疑難排解技巧將可節省您的時間與麻煩。
如果您仍在煩惱 rest_api_init 請考慮有系統地停用外掛程式、使用 Postman 或 REST API Console 等除錯工具,並確認您的環境符合 REST API 開發的所有必要條件。
如果您在 WordPress 中使用自訂 REST API 路由時有任何問題或需要進一步協助,歡迎在下方留言。




回應