Como criar uma barra lateral vertical fixa no Elementor para uma navegação perfeita na página

Uma barra lateral fixa vertical é um elemento de design prático posicionado na parte lateral da página que permanece visível na janela de visualização à medida que os utilizadores se deslocam para baixo. Esta barra lateral de posição fixa pode ser uma ferramenta eficiente para orientar os visitantes através do seu conteúdo, permitindo um acesso rápido a secções específicas da página. Para sítios Web com informações extensas, como páginas de serviços, portefólios ou publicações de blogues, uma barra lateral fixa melhora a experiência do utilizador ao oferecer uma ferramenta de navegação conveniente, facilitando o acesso às secções pretendidas sem necessidade de percorrer muito o ecrã.

Este tutorial irá guiá-lo através da criação de uma barra lateral vertical fixa no Elementor com itens de navegação, ligações de âncora e estilo personalizado para corresponder à estética do seu sítio Web.
Preparação
Antes de começar, certifique-se do seguinte:
- Elementor Pro Instalado e ativado: O efeito autocolante requer o Elementor Pro.
- Configuração da página: Uma página nova ou existente onde pretende adicionar a barra lateral autocolante vertical.
- Familiaridade com os contentores Elementor: Recomendamos que trabalhe com Flexbox Modo de contentor para um controlo mais flexível para este tutorial.
Passo 1: Crie um modelo de página única
Vamos começar por criar um modelo de página única e configurá-lo para alojar o contentor que servirá de barra lateral vertical.
- Navegue para Modelos
No seu painel de controlo do WordPress, aceda a Elementor > Modelos > Adicionar novo.

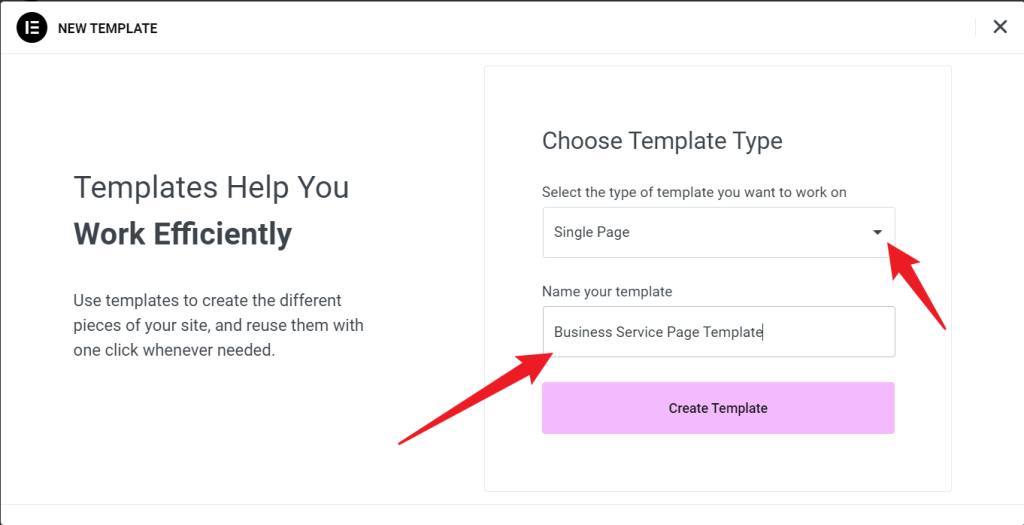
- Selecione o tipo de modelo
Na janela pop-up, selecione Página única como o tipo de modelo e dê-lhe um nome, como "Modelo de página de serviço comercial".
- Selecione o tipo de página
Na parte superior da biblioteca de modelos, selecione a opção Páginas tab.
Percorra os modelos disponíveis para encontrar um estilo adequado. Pode utilizar a barra de pesquisa para encontrar modelos para fins específicos, como "Serviços" ou "Empresa". Se estiver a criar esta barra lateral para um determinado tipo de página, pode também configurar condições nas definições de visualização para limitar o seu aparecimento a páginas específicas.
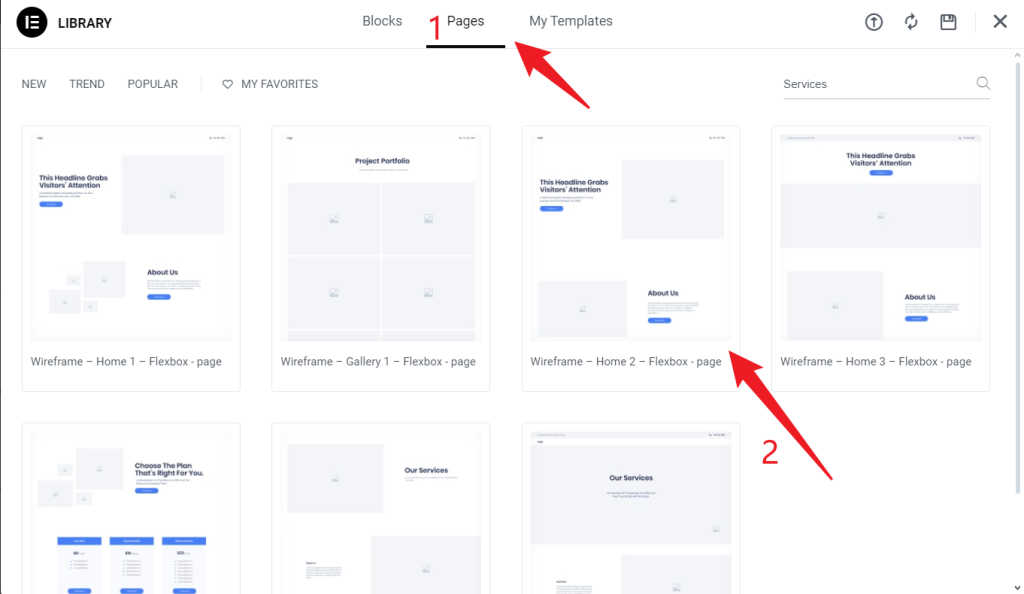
Pode optar por inserir um modelo existente e, se precisar de adicionar navegação lateral autocolante a uma das suas páginas, pode editar a página diretamente.
Passo 2: Crie o contentor no Elementor
Este contentor servirá de base para a barra lateral vertical autocolante.
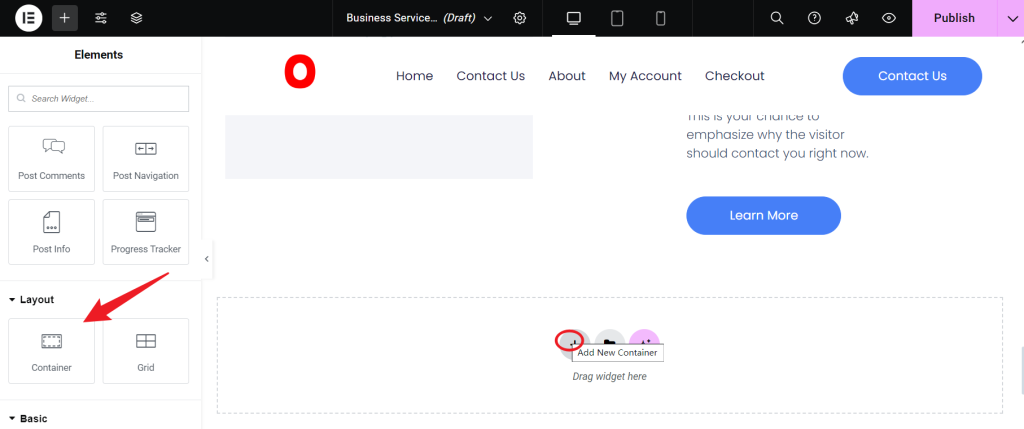
- Adicione o contentor
No editor de páginas, clique em Adicionar novo contentor e arraste-o para a sua área de design. Este contentor funcionará como a estrutura principal da barra lateral autocolante.
- Defina a direção do contentor
Selecione o contentor e, em seguida, defina a sua direção para Vertical no painel de definições à esquerda. Uma direção vertical permite que os itens da barra lateral sejam empilhados de cima para baixo, o que é essencial para criar um esquema de barra lateral vertical.

- Defina a largura do contentor
No Estilo ajuste a largura de acordo com as necessidades da barra lateral, como 200 px ou menos, dependendo das suas preferências de design. Garantir que ocupa o mínimo de espaço na página ajuda a manter o foco no conteúdo principal.

Passo 3: Crie a barra lateral autocolante vertical
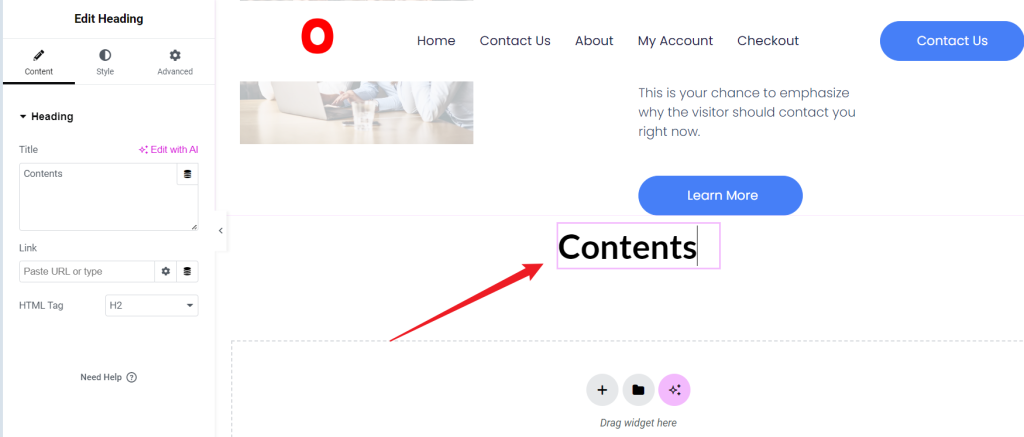
- Inserir título e itens de navegação
Adicione um Título dentro do contentor com um título como "Navegação rápida" ou "Conteúdos".
- Adicionar itens de lista
Insira um Lista de ícones ou Botão abaixo do título para criar itens de navegação. Aqui, utilizaremos uma Lista de ícones para um aspeto simplificado, permitindo espaço entre cada item na barra lateral.
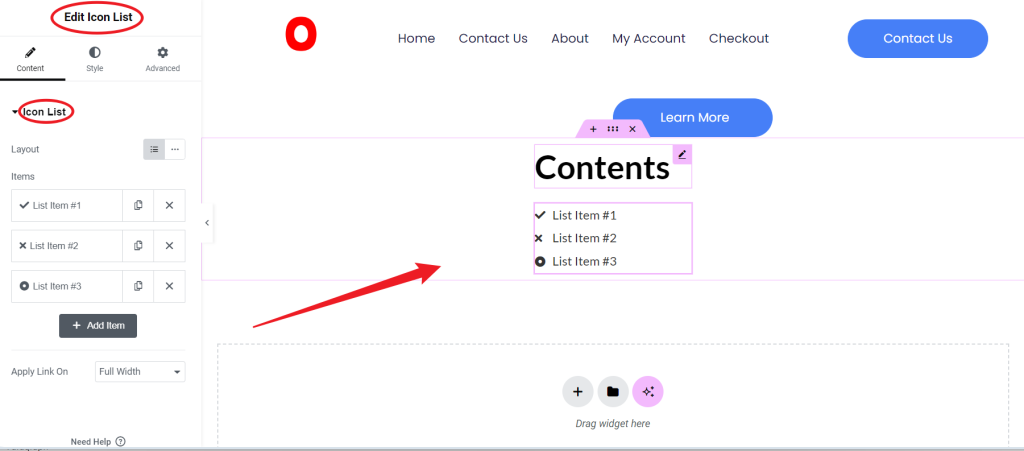
- Adicione ligações de navegação
Para a navegação na barra lateral, adicione itens como:
- Sobre nós: Esta ligação leva-o à visão geral da empresa.
- Os nossos serviços: Aceda à secção de serviços.
- Testemunhos: Conduza à área de feedback do cliente.
- Contacte-nos: Ligações para o formulário de contacto ou para a secção de informações.

Personalize os nomes e os ícones conforme pretendido para refletir a disposição da sua página. Elimine o ícone ou vá à galeria de ícones para o selecionar.
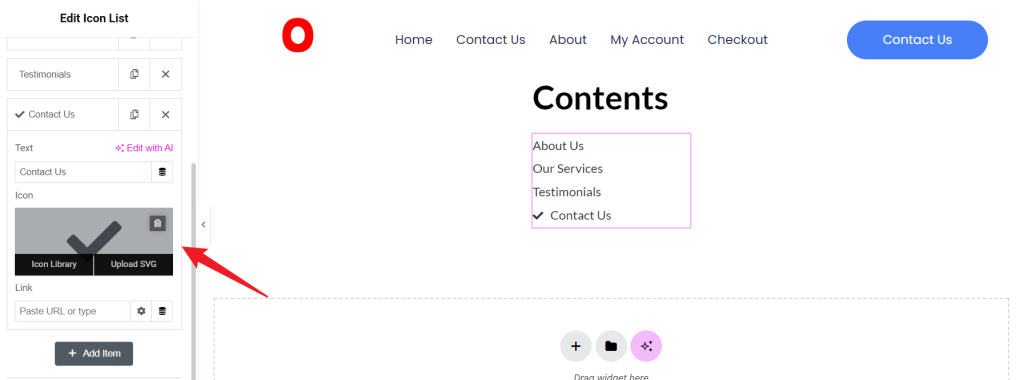
- Definir ligações de ancoragem
Adicione ligações de ancoragem a cada item de navegação, definindo pontos de ancoragem na página. Por exemplo, para uma secção "Sobre nós", utilizaremos 1TP5Sobre nóse ancoragens semelhantes para outras secções.
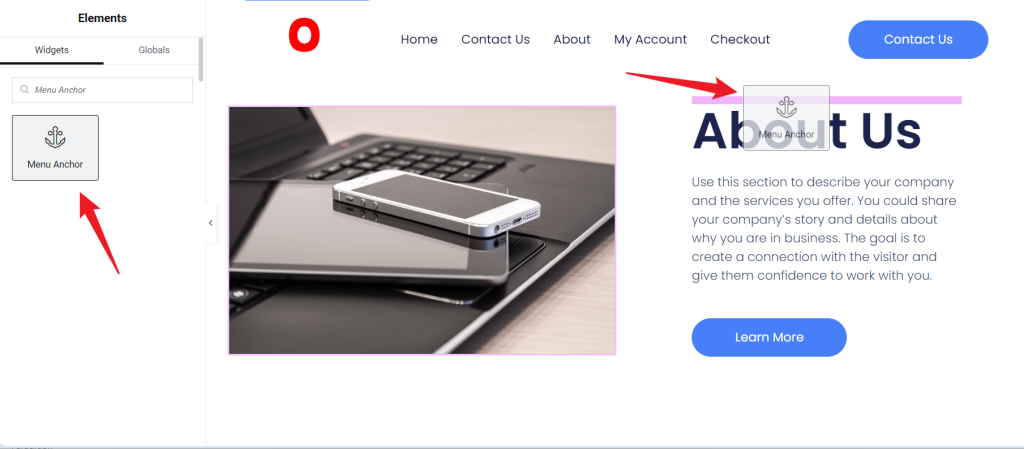
Adicione uma âncora para "Sobre nós"
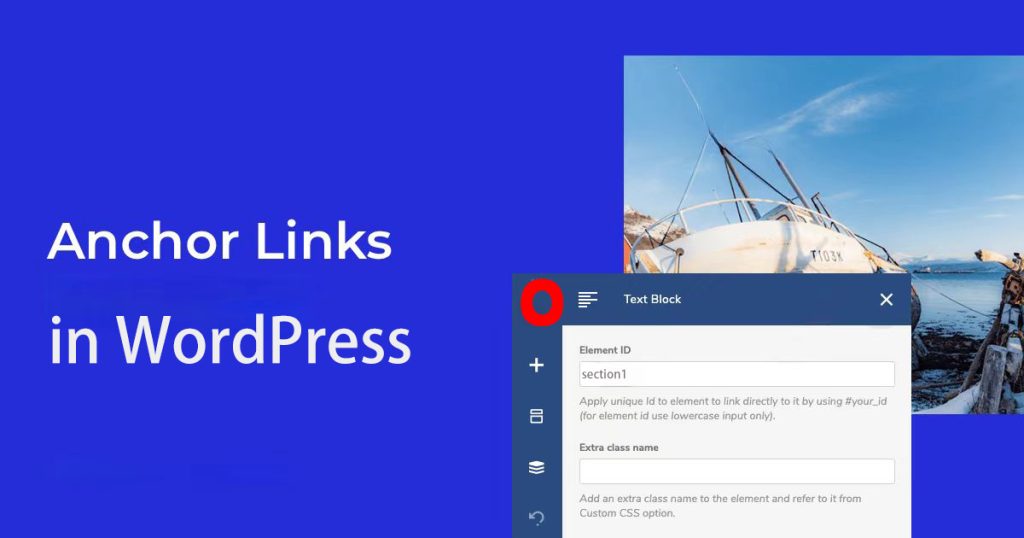
No Elementor, encontre o Âncora de menu widget. Arraste-o para cima do título da secção "Sobre nós" ou para qualquer posição adequada. Dê um nome à âncora (por exemplo, about-us) nas definições para facilitar a ligação posterior.
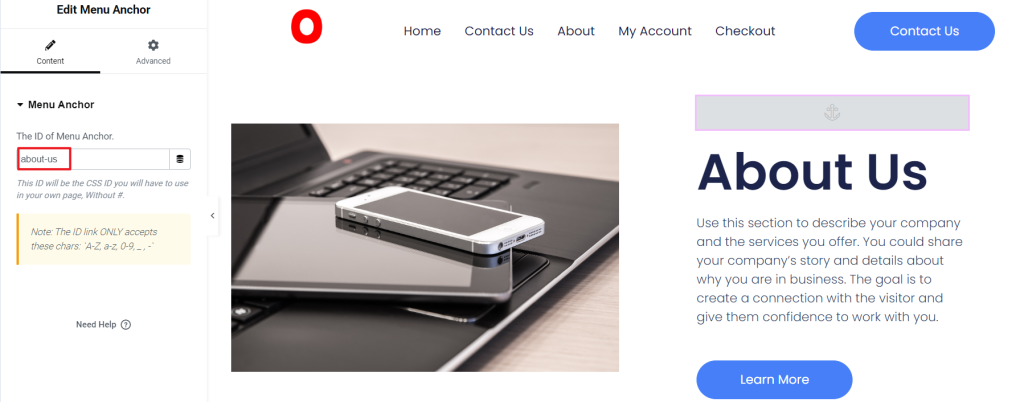
Ligue a âncora à navegação
Regresse ao item da lista de ícones para "Sobre nós" e ligue-o definindo o URL como #about-us. Os utilizadores que clicarem neste item de navegação irão imediatamente para a secção.
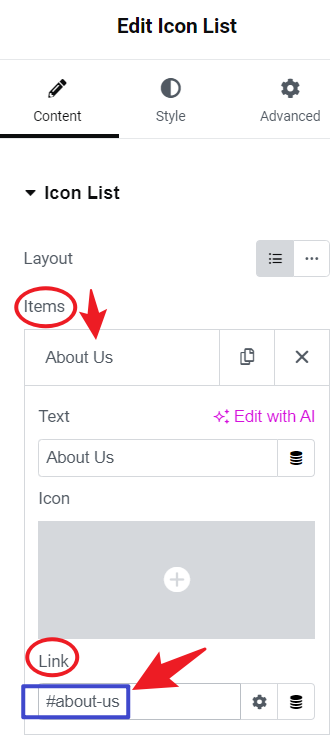
Repita este processo para os restantes itens do menu.
- Defina a largura da barra lateral
Para manter um esquema consistente, defina a largura do contentor Lista de ícones e do contentor principal para um valor fixo, como 200px.
- Personalize o estilo da barra lateral
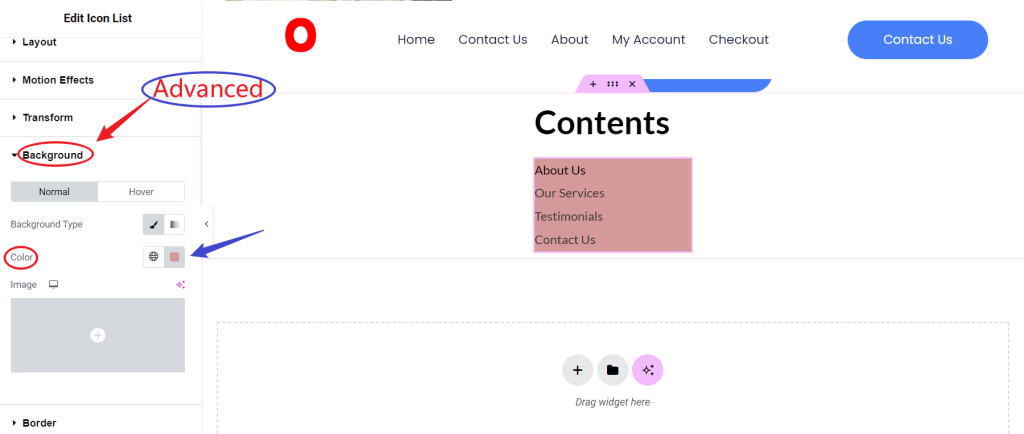
Pode ajustar o tipo de letra, as cores e o espaçamento no Estilo para combinar com o estilo do seu sítio. Também pode adicionar um separador cor de fundoA barra lateral é composta por efeitos de sombra, preenchimento e sombra para a tornar visualmente distinta.
Passo 4: Active o efeito de aderência
Para manter a barra lateral fixa à medida que o utilizador se desloca, siga estes passos:
- Definir a ID CSS para a barra de navegação e a área de conteúdo
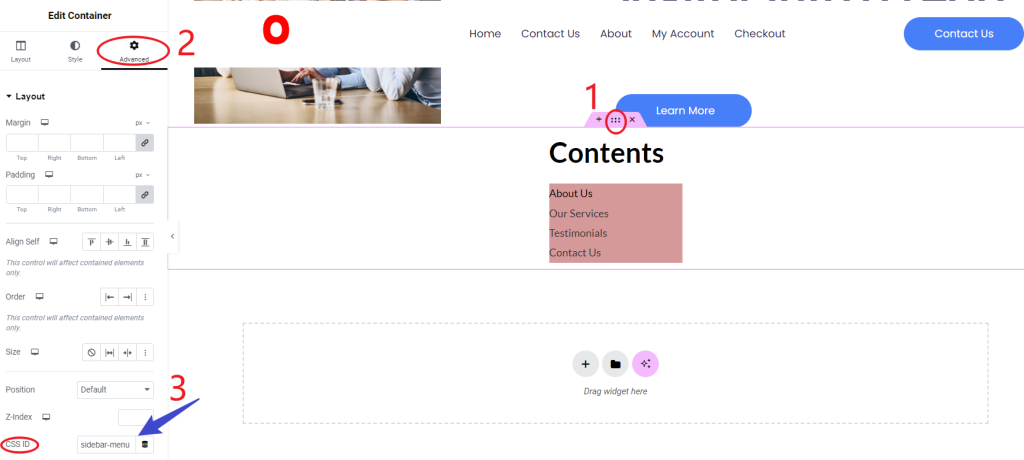
Selecione o contentor da barra de navegação e, no separador Avançadas, adicione uma ID CSS; por exemplo, defina a ID como menu da barra lateral.
- Adicionar código CSS personalizado
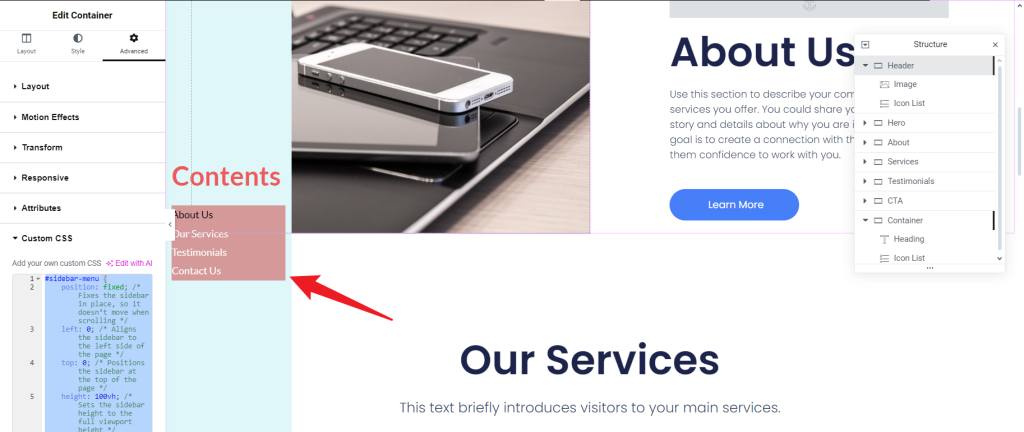
Abra as CSS personalizadas no Elementor (uma definição global ou CSS personalizada para o contentor da barra de navegação). Adicione o seguinte código:
#sidebar-menu {
    position: fixed; /* Fixa a barra lateral no sítio, para que não se mova quando se desloca */
    left: 0; /* Alinha a barra lateral com o lado esquerdo da página */
    top: 0; /* Posiciona a barra lateral no topo da página */
    height: 100vh; /* Define a altura da barra lateral para a altura total da janela de visualização */
    width: 200px; /* Ajusta a largura da barra lateral conforme necessário */
    z-index: 10; /* Assegura que a barra lateral se mantém no topo de outros elementos */
    background-color: #e0f7fa; /* Define a cor de fundo da barra lateral */
    color: #FFF; /* Define a cor do texto dentro da barra lateral */
    padding-top: 250px; /* Acrescenta um enchimento no topo da barra lateral */
    overflow-y: auto; /* Permite o deslocamento se o conteúdo da barra lateral for demasiado longo */
}
Explicação
- posição: fixa;
- Mantém a barra lateral numa posição fixa no ecrã à medida que os utilizadores se deslocam. Permanecerá sempre visível na janela de visualização, independentemente da deslocação da página.
- esquerda: 0;
- Alinhe a barra lateral com a margem esquerda da janela de visualização, posicionando-a ao nível do lado esquerdo da página.
- topo: 0;
- Isto define a barra lateral para começar no topo da janela de visualização, alinhando-a com o topo da página.
- altura: 100vh;
- Define a altura da barra lateral para ocupar toda a altura da janela de visualização (100% da altura da janela de visualização). Isto assegura que a barra lateral se estende desde o topo até à base do ecrã.
- largura: 200px;
- Define a largura da barra lateral para 200px. Este valor pode ser ajustado com base nas necessidades de design.
- z-index: 10;
- Define a ordem de empilhamento da barra lateral. Um índice z mais elevado assegura que a barra lateral aparece acima de outros elementos que se possam sobrepor.
- cor de fundo: #e0f7fa;
- Isto define a cor de fundo da barra lateral. Aqui, foi escolhido um azul pastel claro (#e0f7fa) para dar um aspeto de calma e limpeza.
- cor: #FFF;
- Define a cor do texto na barra lateral para branco (#FFF). Isto proporciona contraste com o fundo azul pastel, melhorando a legibilidade.
- enchimento superior: 250px;
- Adiciona preenchimento na parte superior da barra lateral. Isto pode ser útil se pretender que o conteúdo principal da barra lateral (como as hiperligações de navegação) comece mais abaixo, deixando espaço no topo para a marca ou logótipos.
- overflow-y: auto;
- Permite a deslocação vertical dentro da barra lateral se o conteúdo exceder a sua altura. Isto assegura que o conteúdo permanece acessível sem afetar a disposição geral da página.

Uma barra lateral vertical fixa é um elemento de design que permanece fixo na parte lateral de uma página Web à medida que os utilizadores se deslocam, proporcionando uma navegação rápida para secções específicas. Este tutorial orienta-o na criação de uma barra lateral fixa no Elementor, utilizando itens de navegação, ligações de ancoragem e estilo personalizado para uma experiência de utilizador perfeita. Com o Elementor Pro instalado, irá criar um modelo de página única, configurar um contentor para a barra lateral, adicionar itens de navegação e atribuir ligações de ancoragem. Por fim, ao adicionar CSS personalizado, a barra lateral permanece fixa na janela de visualização, melhorando a acessibilidade em páginas com muito conteúdo, como secções de serviços ou de portefólio.




Respostas