Elementorで魅力的なカスタム404ページを作成してユーザー体験を向上させる方法

はじめに
404 Page Not Found(404ページが見つかりません)」エラーは、訪問者の閲覧体験を妨げ、サイトを放棄させる可能性があります。デフォルトの、多くの場合当たり障りのない404エラーページの代わりに、カスタムデザインは、ユーザーを重要なコンテンツに誘導し、ナビゲーションを改善し、ブランドに沿ったユニークな体験を提供する貴重な機会を提供します。Elementorはカスタム404ページを自動的に設定しませんが、以下の2つを使って手動で404ページを作成し、統合することができます。 エレメンタル・プロ そして エレメンタ 無料.ここでは、Elementorの各バージョンのステップバイステップのプロセスを説明します。 創造 シンプルで効果的。

Elementorでカスタム404ページを作成します:詳細な手順
Elementor Proによるカスタム404ページの設定
Elementor Pro ユーザーは テーマビルダー 機能は、404ページの作成と割り当てを簡素化します。この機能により、特定の テンプレート これは、ユーザーが見つからないページに遭遇したときに自動的に表示されます。
ステップ1:テーマビルダーへのアクセス
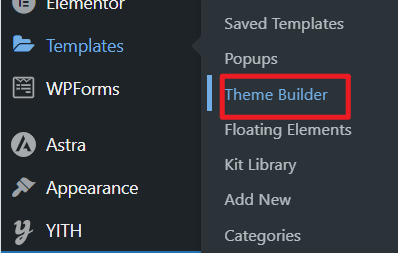
- WordPressのダッシュボードで、次の場所に移動します。 テンプレート > テーマビルダー.
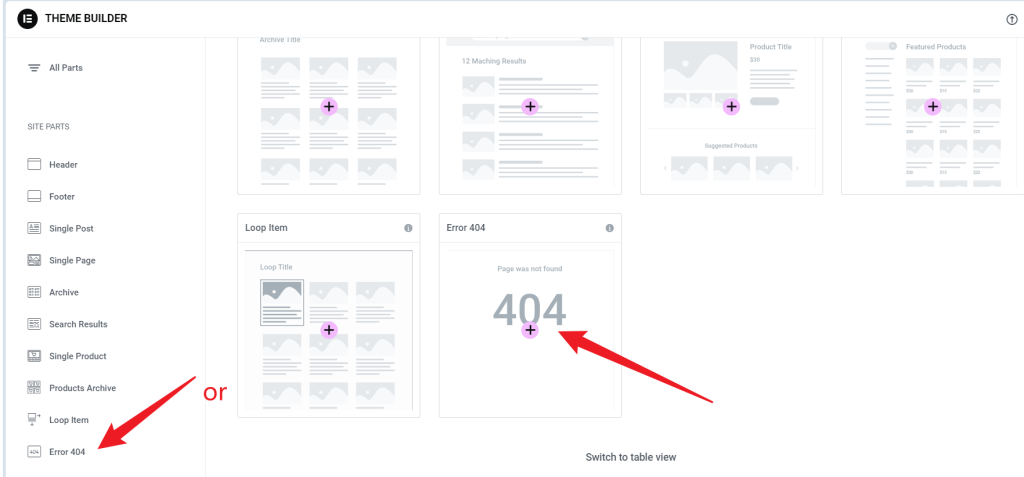
- クリック 新規追加 を選択します。 404ページ をテンプレート・タイプとして使用します。
- この設定は、カスタム404エラーページをデザインするための白紙のキャンバスを開きます。 一から.
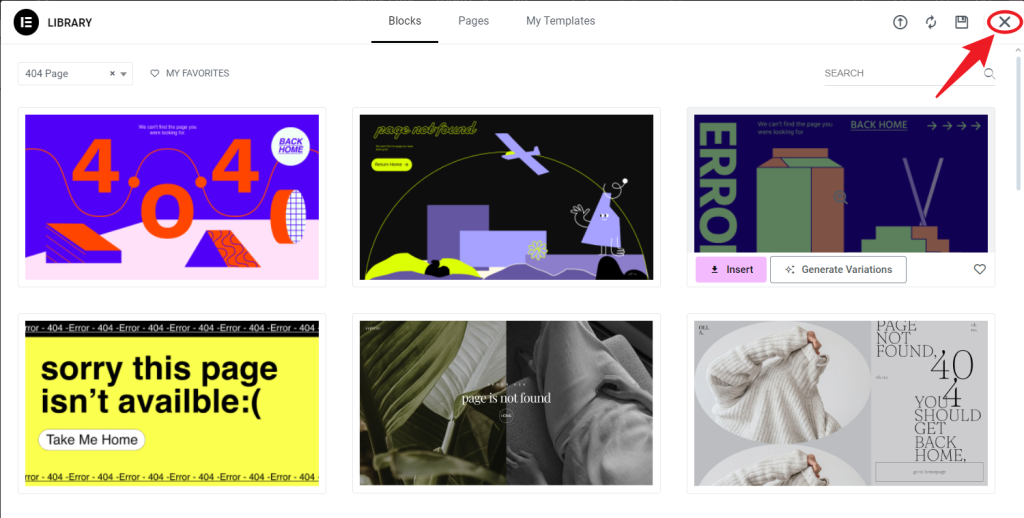
- をクリックすると、そのページに移動します。
ステップ2:ページレイアウトのデザイン
- 親切なエラーメッセージ:
- を使用します。 見出し ウィジェット のような明確で歓迎のメッセージを作成します!Page Not Found "や "We're sorry, but that page does not exist "のような明確な歓迎メッセージを作りましょう。
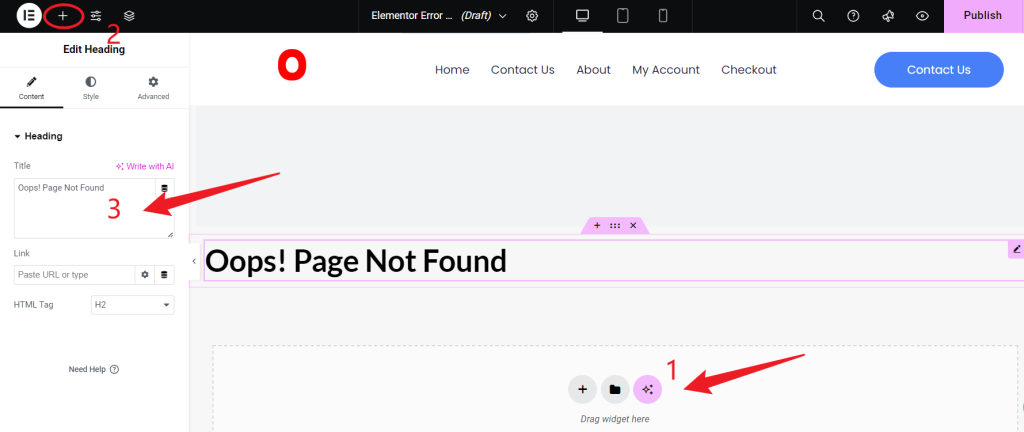
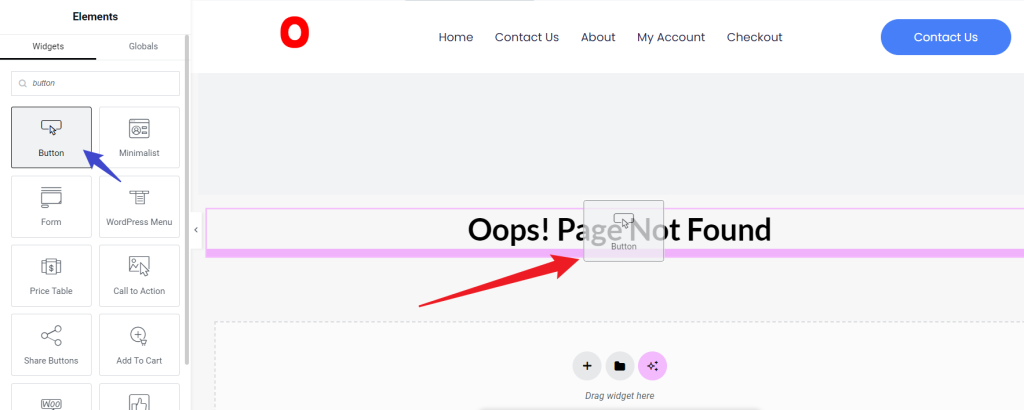
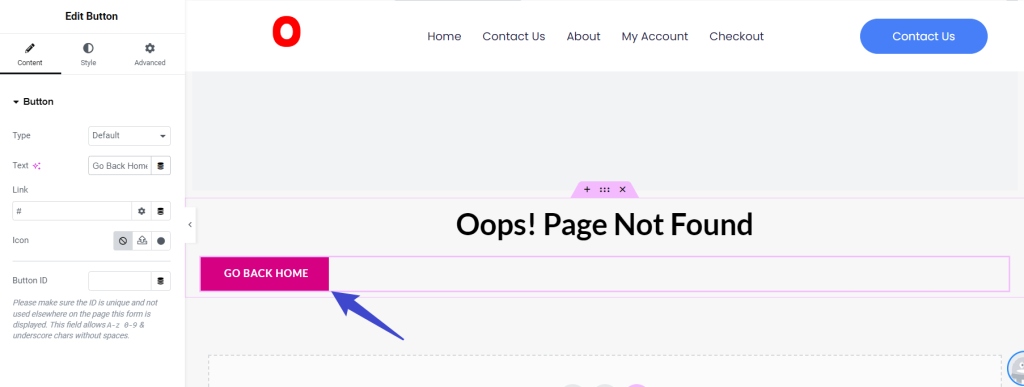
- ナビゲーションリンクの追加 ボタン:
- などの人気ページにリンクするボタンを1つ以上入れてください。 ホームページ, ブログまたは お問い合わせ.を追加します。 検索 バーは、特定のコンテンツを探しているユーザーにも役立ちます。
- Elementor内でURLリンクを直接設定することで、各ボタンをカスタマイズできます("Go Back Home "など)。
- 視覚的要素を含む:
- ユーザーを引きつけるために、ブランドのスタイルに沿った画像、アイコン、アニメーションを追加することを検討してください。
- オプション要素:
- アニメーションやアイコン、ユーモラスなビジュアルタッチなどの要素を加えることで、404ページをより魅力的なものにすることができます。

ステップ3:テンプレートの割り当て
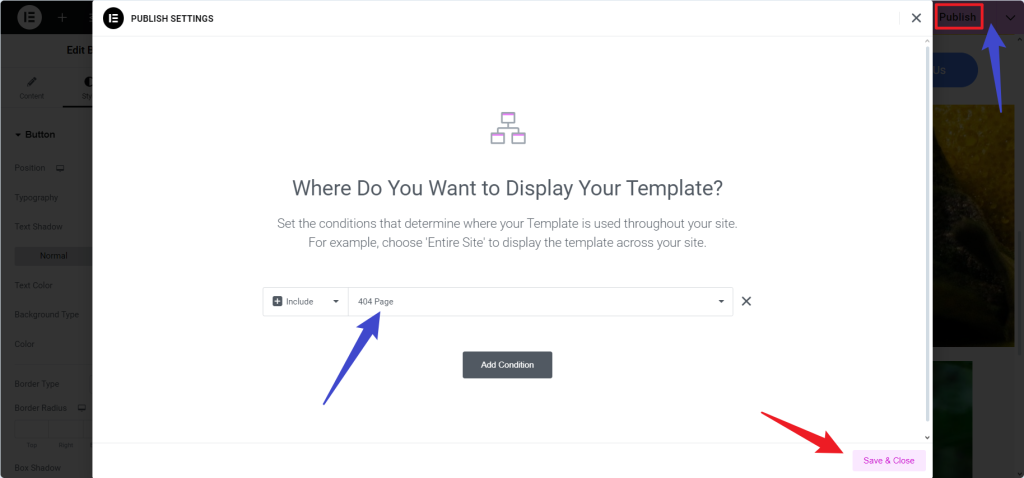
- デザインが確定したら 出版.
- を設定します。 表示状態 として 404ページ を使用して、エラーURLに対してのみページが表示されるようにします。
- 設定を保存して閉じ、テンプレートの割り当てを確定します。
ステップ4:404ページのテスト
- すべてが計画通りに動作することを確認するには、サイト上の存在しないURL(たとえば、yourwebsite.com/thispagedoesnotexist)に移動します。
- 404ページが正しく表示されることを確認し、各リンクやボタンが期待通りにユーザーを誘導することをテストしてください。

Elementorでカスタム404ページを作る 無料
Elementor Freeでは テーマビルダー しかし、テンプレートをデザインし、それをテーマの404.phpファイルに埋め込むことで、カスタム404ページを作成することができます。
ステップ1:404ページのデザイン
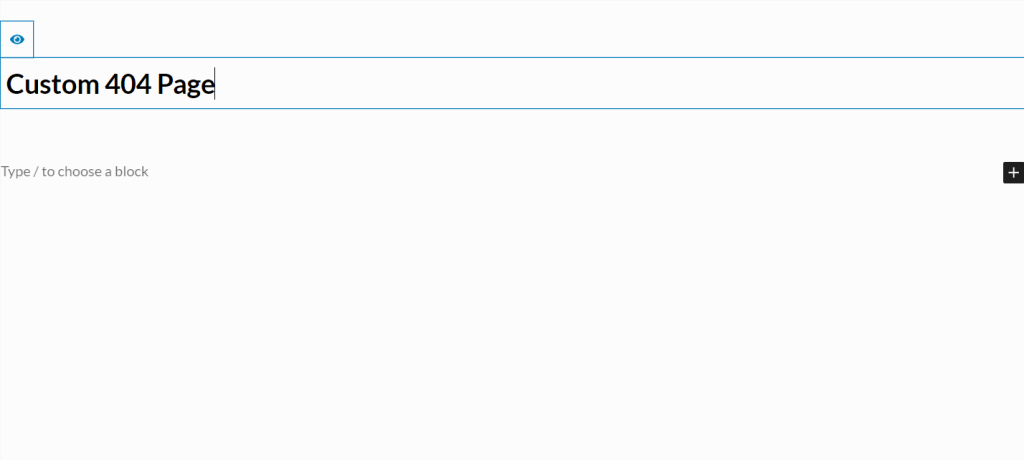
- 新しいページの作成:
- こちらへ ページ > 新規追加 カスタム404ページ" のような名前をつけてください。
- ユーザーフレンドリーなナビゲーションのための要素の追加:
- 追加 見出し ウィジェットに、"Page Not Found "や "Sorry, this page does not exist "といったエラーメッセージを入力してください。
- が含まれます。 ボタン ウィジェットは必須ページへのリンクと 検索 ウィジェットは、ユーザーが素早くコンテンツを見つけられるようにします。
- ビジュアル、アイコン、画像などを使って、視覚に訴えるページを作りましょう。
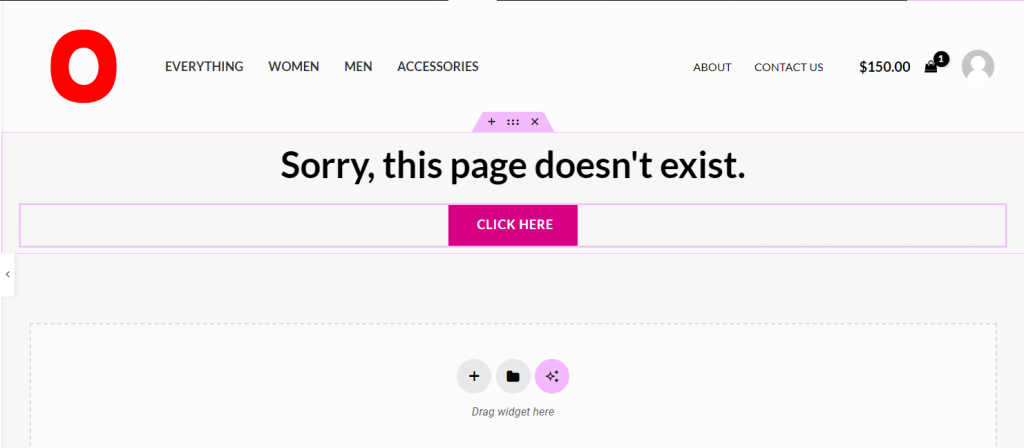
- テンプレートとして保存:
- をクリックしてください。 更新/公開ボタンの横にある矢印 を選択します。 テンプレートとして保存 をクリックしてデザインを保存します。

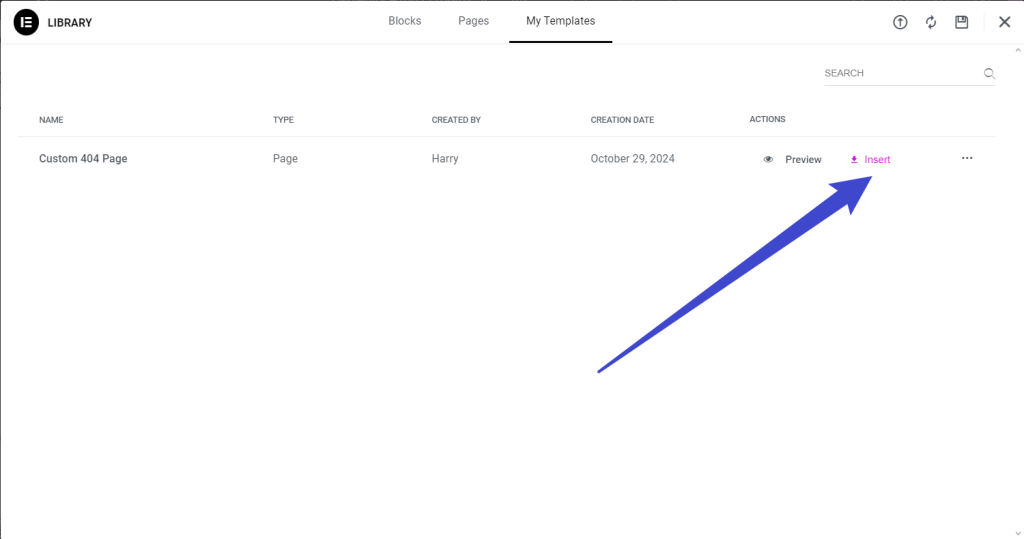
ステップ 2: テンプレートとテーマの統合
- テンプレートのショートコードを取得:
- こちらへ テンプレート > 保存されたテンプレート を見つけてコピーします。 ショートコード 新しく保存した404テンプレートの
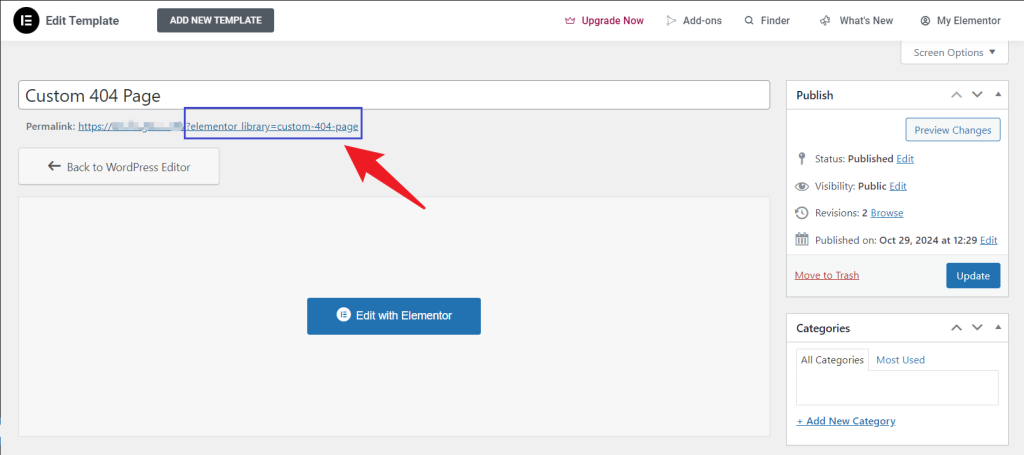
- 404.phpファイルの編集:
- で 外観 > テーマファイルエディタ (またはFTPで)、/wp-content/themes/your-theme/の下にあるテーマの404.phpファイルを見つけてください。
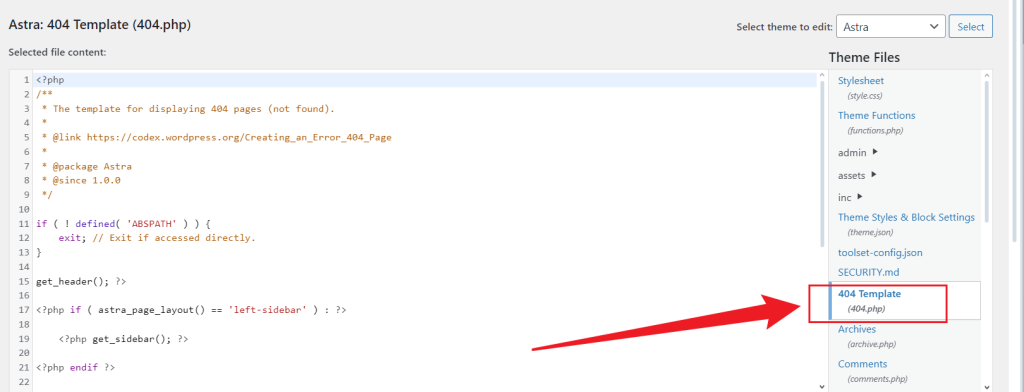
- テンプレートのショートコードを挿入:
- 404.phpの内容を以下のコードに置き換え、.phpの代わりにテンプレートのショートコードを挿入します:
<?php

// Your theme's header and additional elements

?>

<div id="primary" class="content-area">

  <main id="main" class="site-main" role="main">

    <?php echo do_shortcode('[elementor-template id="123"]'); ?>

  </main>

</div>

<?php

// Your theme's footer and additional elements

?>- 変更の保存 を404.phpファイルに追加します。

ステップ3:ページのテスト
- 404ページが意図したとおりに表示されることを確認するには、サイト上の存在しないURLに移動し、すべてのリンクと要素が正しく動作していることを確認します。
ユーザーエクスペリエンス向上のための404ページの改善

カスタム404ページは単なるプレースホルダーではなく、役立つナビゲーションオプションやちょっとした個性でユーザーを引きつけるチャンスです。効果的な404ページを作成するためのヒントをいくつかご紹介します:
- メッセージのパーソナライズ:おっと!Something went wrong "や "We couldn't find the page "のようなフレンドリーな言葉は、体験を向上させます。
- 関連リンクのハイライト:ユーザーを誘導するために、人気のカテゴリーや最新のブログ記事へのリンクを掲載します。
- インタラクティブ要素の使用:シンプルなアニメーションやホバー効果で、インタラクティブなタッチを加えます。
- ブランドの一貫性の確保:ウェブサイトの色、フォント、ロゴを404ページに反映させ、全体のスタイルに合わせましょう。
結論
Elementorでカスタム404エラーページを作成することで、訪問者がエラーページに到達した場合でも、訪問者の関心を引き続けることができます。Elementor Proではテーマビルダーを使ってこのページを簡単に割り当てることができ、Elementor Freeではテンプレートの統合によって同様の効果を得ることができます。これらのステップに従うことで、ユーザーは常にコンテンツに戻る明確な方法を確保することができ、最終的にナビゲーションを改善し、フラストレーションを最小限に抑え、サイト全体のユーザーエクスペリエンスを向上させることができます。




回答