Complete Guide to Adding and Customizing Product Information in WooCommerce

In WooCommerce, product attributes offer a flexible way to define various characteristics for different types of products. Setting up product attributes can improve user experience by helping customers quickly find essential details, such as color, size, or material. Enriching product pages with detailed information increases content depth, benefiting search engine optimization (SEO) and improving product visibility.

This article covers several methods to add additional information to WooCommerce product pages, including using WooCommerce’s built-in features, the Advanced Custom Fields (ACF) plugin, and custom code. Choose the method that best suits your needs.
Why Adding Additional Information Enhances User Experience and SEO
For example, if you sell apparel, customers may want to know about color, size, and fabric. By setting these attributes, WooCommerce automatically displays them under the “Additional Information” tab on the product page, allowing users to access essential details quickly. This functionality enables better product comparison for users and improves the page’s SEO performance by adding relevant content.
Method 1: Adding Additional Information Using WooCommerce’s Built-In Features
WooCommerce offers a straightforward way to add product attributes directly to the product editing screen. Here are the steps:
Step 1: Log in to the WooCommerce Dashboard
Navigate to the WordPress dashboard, click “Products,” and select the product for which you want to add additional information.
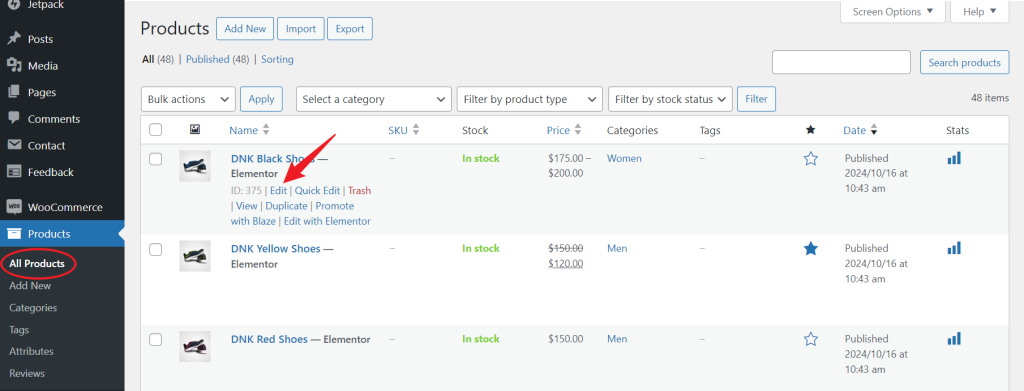
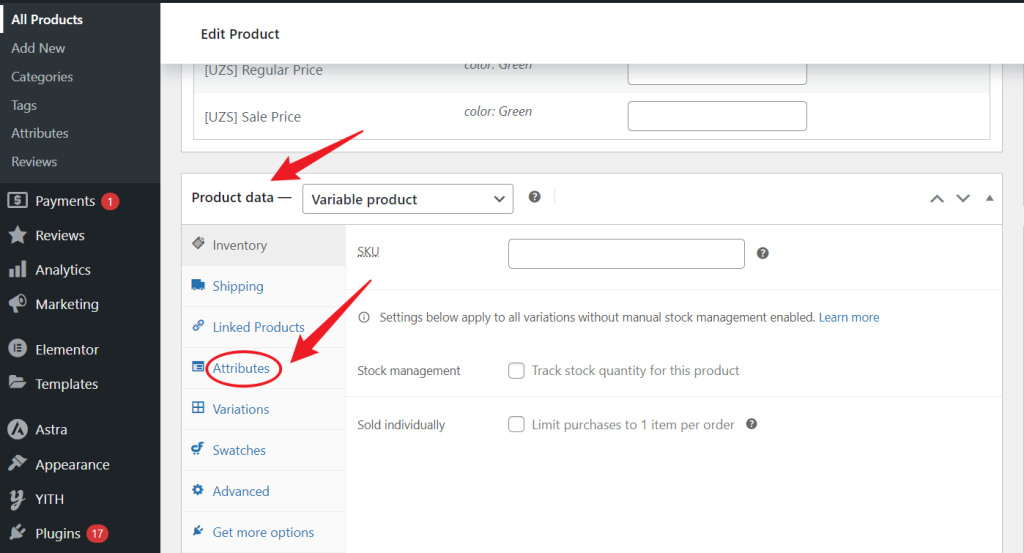
Step 2: Locate the “Product Data” Section
In the product editor, scroll down to the “Product Data” panel, and select the “Attributes” tab.
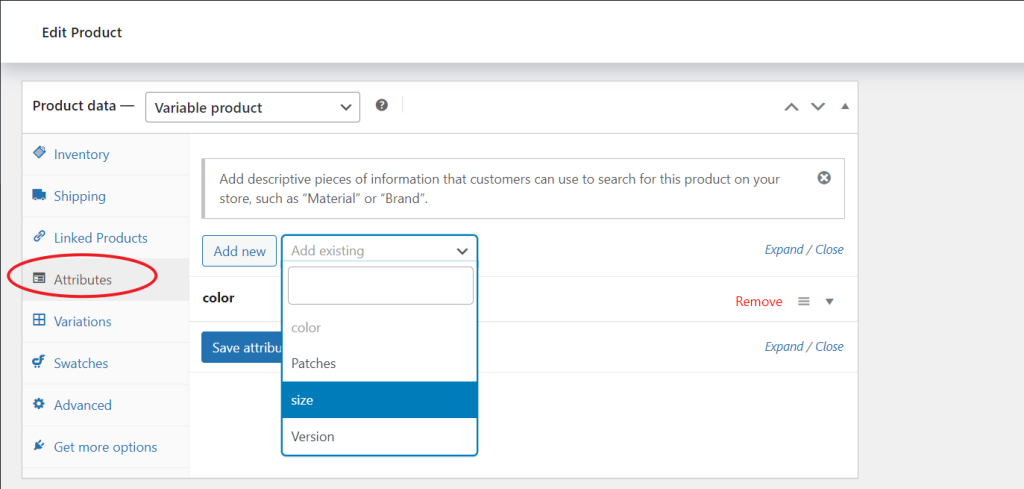
Step 3: Add Attributes
Click the “Add new” button to define new attributes such as “Color” or “Size.”
- Enter the attribute name, for example, “Color.”
- Separate attribute values with a vertical bar (|), such as “Red | Blue | Green.”
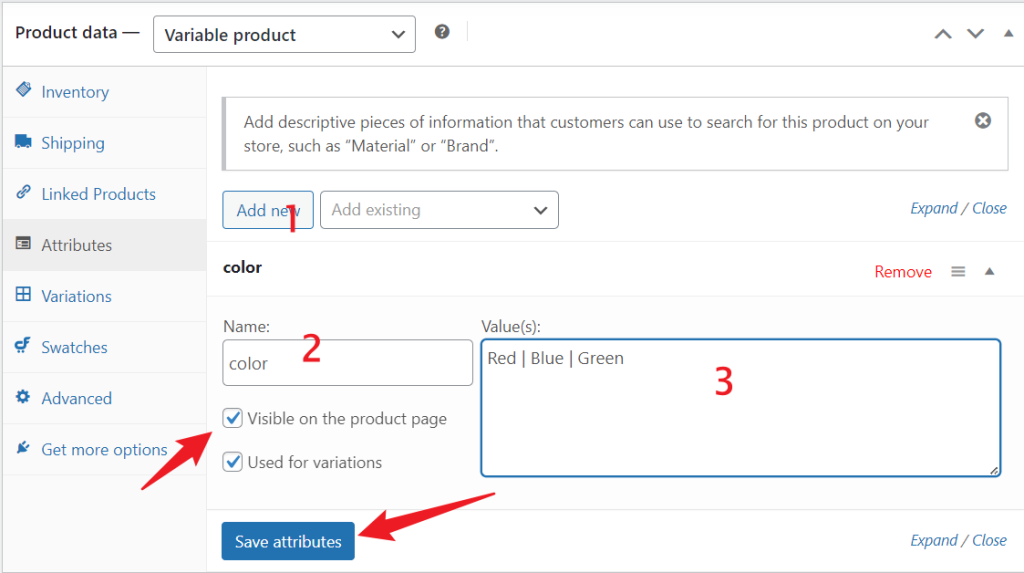
Step 4: Set Attribute Visibility
Check the “Visible on the product page” option to ensure these attributes appear under the “Additional Information” tab on the product page.
Step 5: Save and Update the Product
Click the “Update” button to save your changes. Once saved, the “Additional Information” tab on the product page will automatically display these attributes.

Example
If you’re selling a T-shirt that comes in three colors (Red, Blue, Green) and three sizes (S, M, L), you can set the “Color” attribute to “Red | Blue | Green” and the “Size” attribute to “S | M | L.” When the “Visible on the product page” option is checked, customers will see these options under the “Additional Information” tab.
Method 2: Adding Additional Information Using the Secure Custom Fields (SCF) Plugin
While WooCommerce’s built-in attributes are helpful, more is needed for certain needs. With the Secure Custom Fields (SCF) plugin, you can add more custom fields to display additional product details, like material and care instructions.
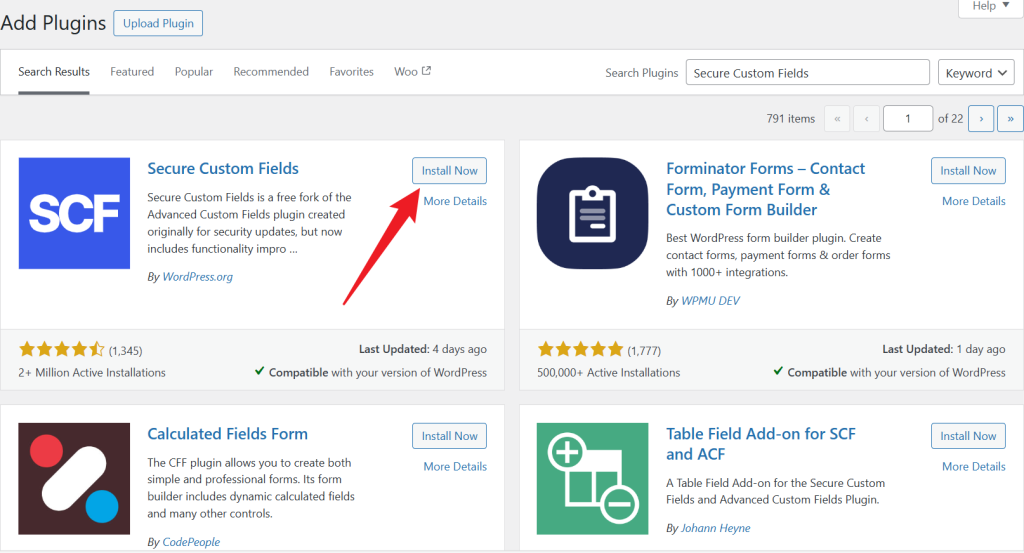
Step 1: Install the ACF Plugin
Go to “Plugins” in the WordPress dashboard, search for “Secure Custom Fields,” and click “Install” and “Activate.”
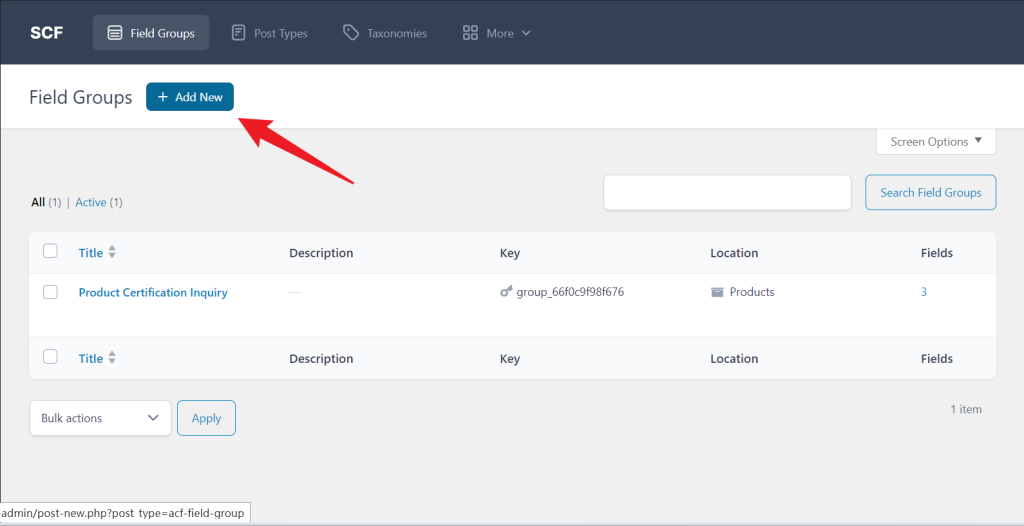
Step 2: Create a Field Group
Go to “SCF” from the WordPress dashboard and select “Add New Field Group.” This allows you to define custom fields for your products.
Step 3: Define Fields
Within the field group, add new fields such as “Material” or “Care Instructions.” Choose field types like text, text area, or image as needed.
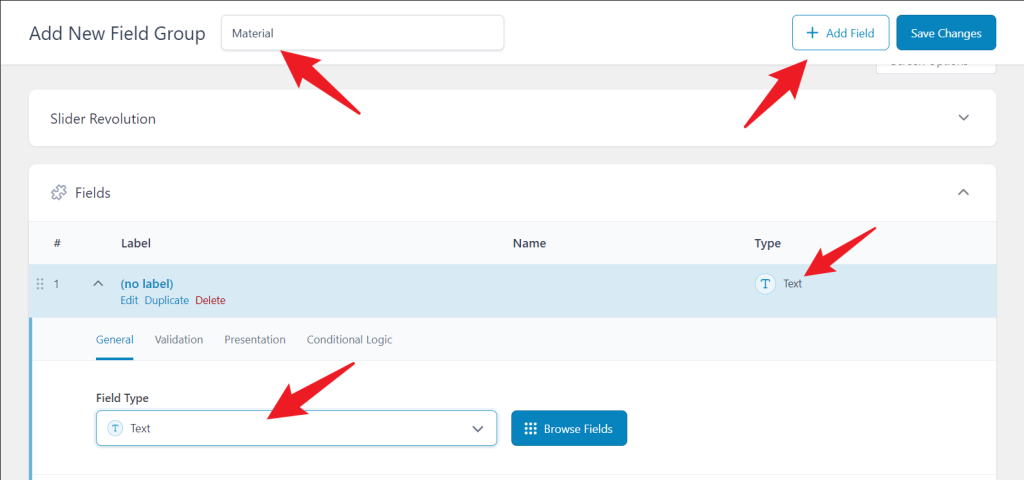
Here’s a breakdown of some common field types:
- Text: This field is ideal for short, single-line inputs. For example, you might use it for a “Material” field if you only need to list one or two materials, such as “100% Cotton” or “Stainless Steel.”
- Text Area: This is useful for longer descriptions. You might use it for “Care Instructions,” where you can provide detailed washing or handling information, like “Hand wash only. Do not tumble dry.”
- Image: This option allows you to add images. It could be used for fields like “Product Certification,” where you want to display a certification logo or quality seal.

Example:
Suppose you sell wooden furniture and want to add the following custom fields:
- Material—This could be a “Text” field to input specific wood types, such as “Oak” or “Maple.”
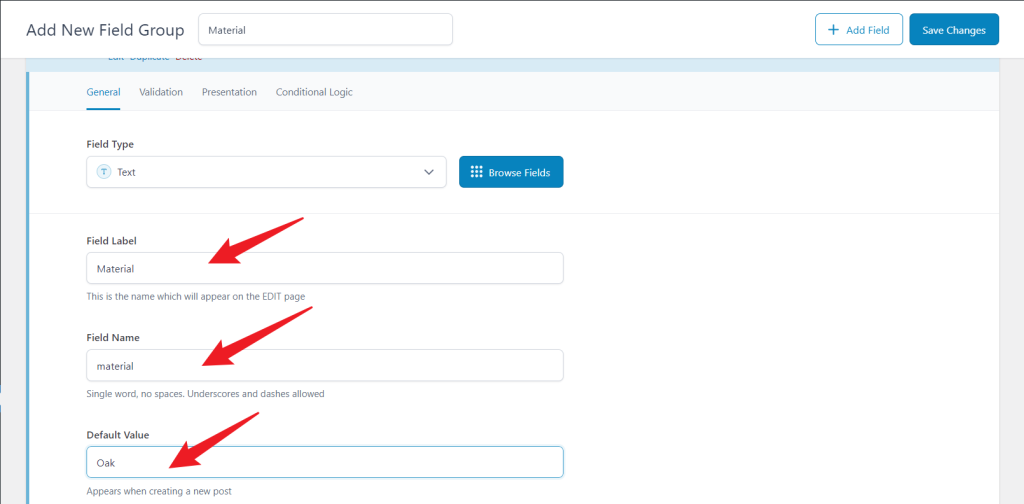
- Care Instructions – Set this as a “Text Area” where you can detail care tips, such as “Wipe with a dry cloth. Avoid direct sunlight.”
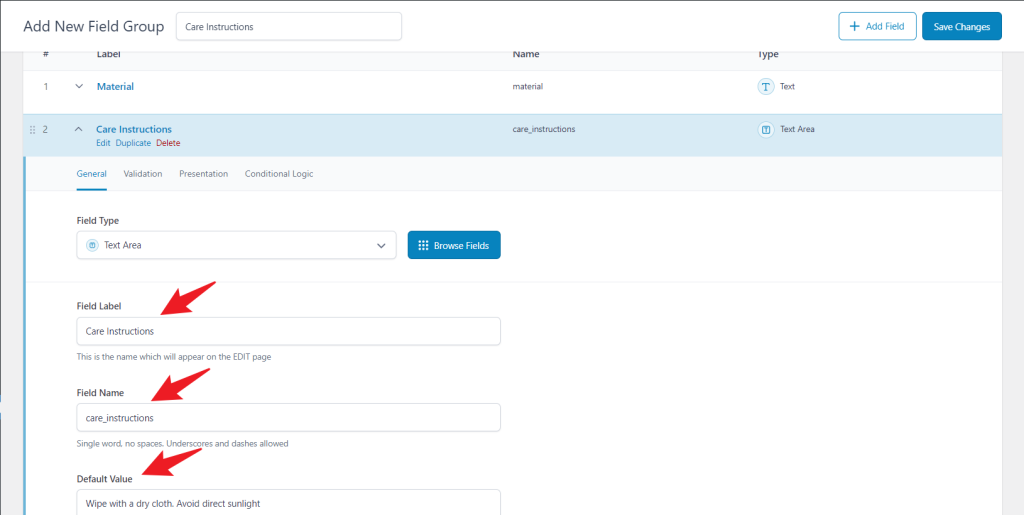
- Certification Logo – Use an “Image” field to upload a certification seal or eco-friendly badge.
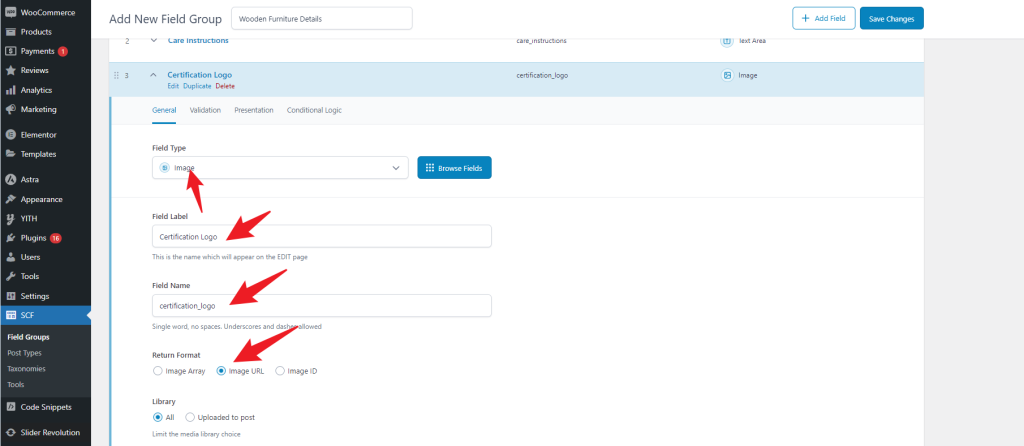
After defining these fields, they will appear in the product editor, ready for you to enter information specific to each product.
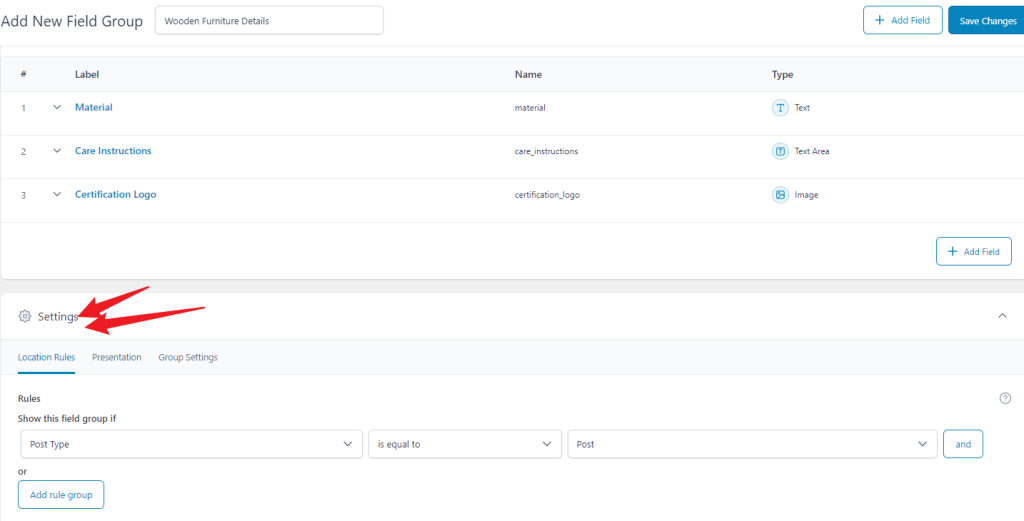
Step 4: Set Display Rules
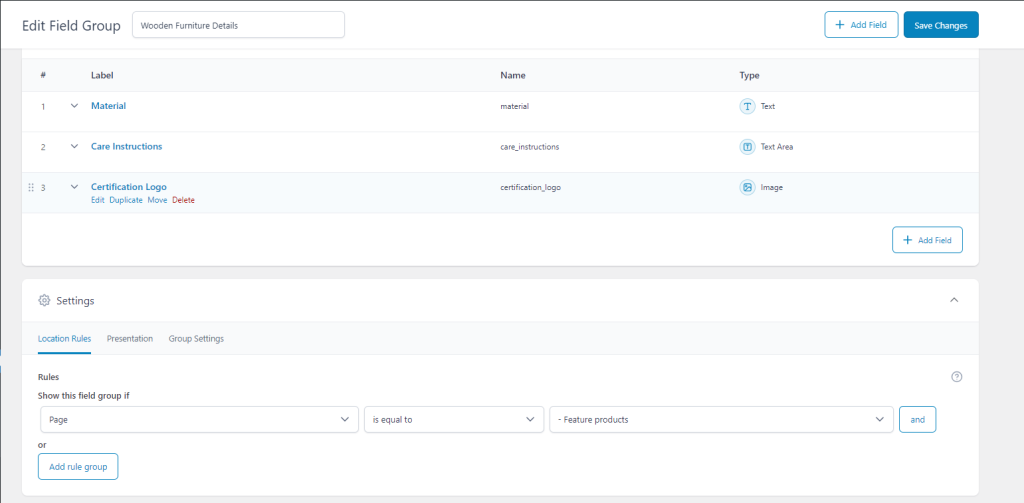
In the “Settings” section, define the conditions under which these custom fields should be displayed on product pages. You can apply these fields to all products or specific categories, tags, or even individual products.
Step 5: Enter Information in the Product Editor
Once the fields are defined and display rules are set, go to the WooCommerce product editor for any product that meets the criteria. You will now see the custom fields you’ve created and can enter relevant information for each one.
Step 6: Modify Product Template (Optional)
To display these custom fields on the front end of the product page, you may need to edit WooCommerce’s template files (e.g., single-product.php). Use SCF’s the_field() function to output the field values like so:
<div class="product-material">

    <h4>Material:</h4>

    <p><?php the_field('material'); ?></p>

</div>
Method 3: Adding Additional Information Using Custom Code
By adding code to your theme’s functions.php file, you can add fields directly to the WooCommerce product editing screen for more advanced customization.
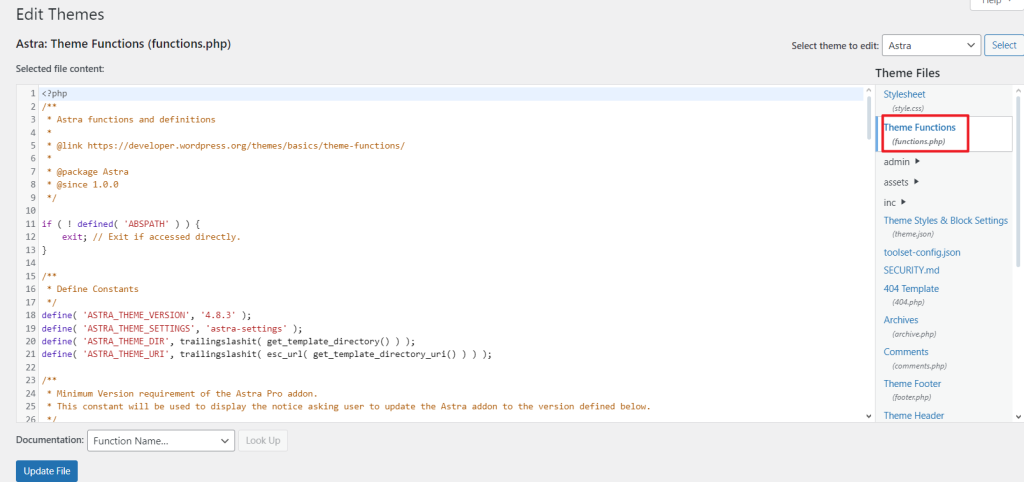
Step 1: Add a Custom Field to the Product Editor
Use the woocommerce_product_options_general_product_data hook to add a custom field to the product editing screen.
add_action( 'woocommerce_product_options_general_product_data', 'add_custom_general_fields' );

function add_custom_general_fields() {

    woocommerce_wp_text_input( array(

        'id' => '_custom_product_text_field',

        'label' => __( 'Custom Product Field', 'woocommerce' ),

        'desc_tip' => 'true',

        'description' => __( 'Enter custom field content', 'woocommerce' )

    ));

}
Step 2: Save Custom Field Value
Use the woocommerce_process_product_meta hook to save the custom field’s value.
add_action( 'woocommerce_process_product_meta', 'save_custom_general_fields' );

function save_custom_general_fields( $post_id ) {

    $custom_field_value = isset( $_POST['_custom_product_text_field'] ) ? sanitize_text_field( $_POST['_custom_product_text_field'] ) : '';

    update_post_meta( $post_id, '_custom_product_text_field', $custom_field_value );

}
Step 3: Display Custom Field on the Product Page
To display the custom field on the front end, use get_post_meta() in the WooCommerce product template.
echo '<div class="custom-field">';

echo '<label>Custom Field: </label> ';

echo get_post_meta( get_the_ID(), '_custom_product_text_field', true );

echo '</div>';
Managing the WooCommerce “Additional Information” Tab
The “Additional Information” tab in WooCommerce is useful for displaying detailed product attributes, but you may want to customize its content or even hide it in some instances.

Adding Custom Text to the “Additional Information” Tab
To add custom content, like a link, to the “Additional Information” tab, use the following code:
add_action( 'woocommerce_product_additional_information', 'print_custom_html' );

function print_custom_html() {

    echo '<a href="#">Click here for more product details</a>';

}
Hiding or Removing the “Additional Information” Tab
If a product doesn’t require additional information (e.g., a digital product), you can remove this tab with the following code:
add_filter( 'woocommerce_product_tabs', 'remove_additional_information_tab', 98 );

function remove_additional_information_tab( $tabs ) {

    unset( $tabs['additional_information'] );

    return $tabs;

}
Conclusion
Adding additional information to WooCommerce product pages enhances user experience and SEO. WooCommerce’s built-in features, plugins like Secure Custom Fields (SCF), and custom coding provide flexible options to enrich product pages with details like color, size, material, care instructions, and certifications.
- Using Built-In Features: Quickly add attributes directly to the product editor, enhancing user experience by displaying essential details in the “Additional Information” tab.
- Using SCF Plugin: Go beyond the basics and create custom fields to present specific product details, such as materials or care instructions, allowing better information management and customization for different product types.
- Using Custom Code: For advanced customization, adding custom fields with code directly to the functions.php file offers complete control over how information is presented on product pages.
Managing the “Additional Information” tab allows you to add, modify, or remove content depending on product needs, ensuring your customers can access relevant information without unnecessary clutter. Overall, enriching WooCommerce product pages helps customers make informed purchasing decisions, increasing conversions while improving your site’s SEO.


Responses