
Evite desastres de despliegue: Domine las mejores prácticas de implantación de WordPress
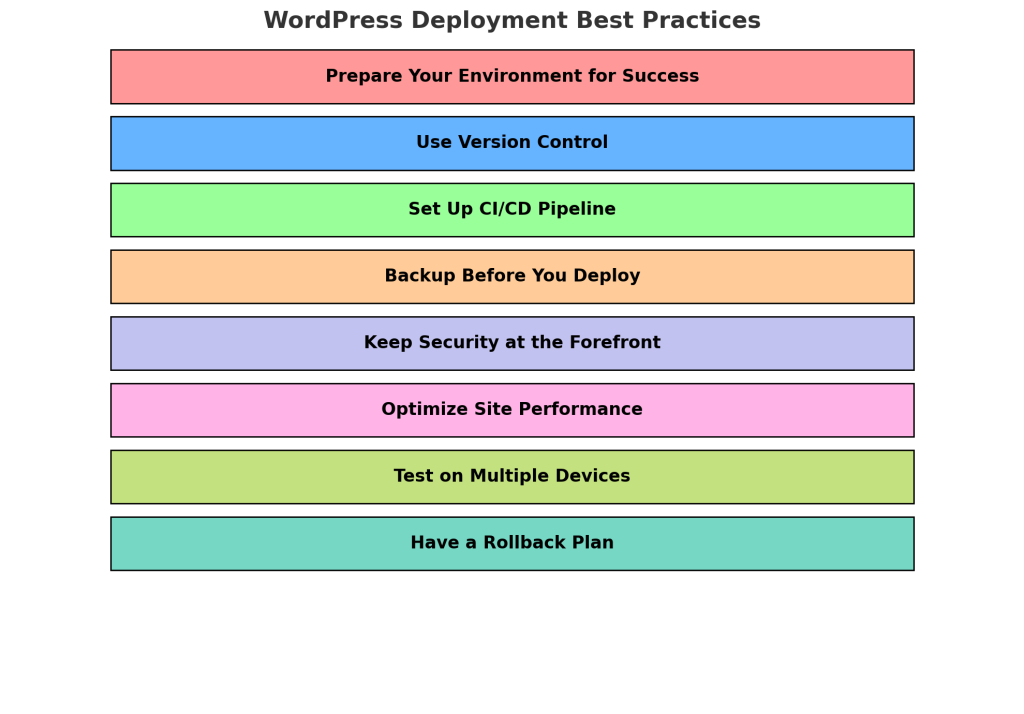
Desplegar un sitio web de WordPress puede parecer sencillo: basta con pulsar unos cuantos botones y ya está en marcha, ¿verdad? Pero cualquier desarrollador experimentado le dirá que a menudo es un acto de equilibrio entre el éxito y el desastre. Una implantación de WordPress sin problemas consiste en evitar los errores más comunes, garantizar la seguridad y asegurarse de que su sitio funcione bien desde el primer día. Sumerjámonos en algunas de las mejores prácticas, sin tonterías, para asegurarnos de que su despliegue se realiza sin problemas.
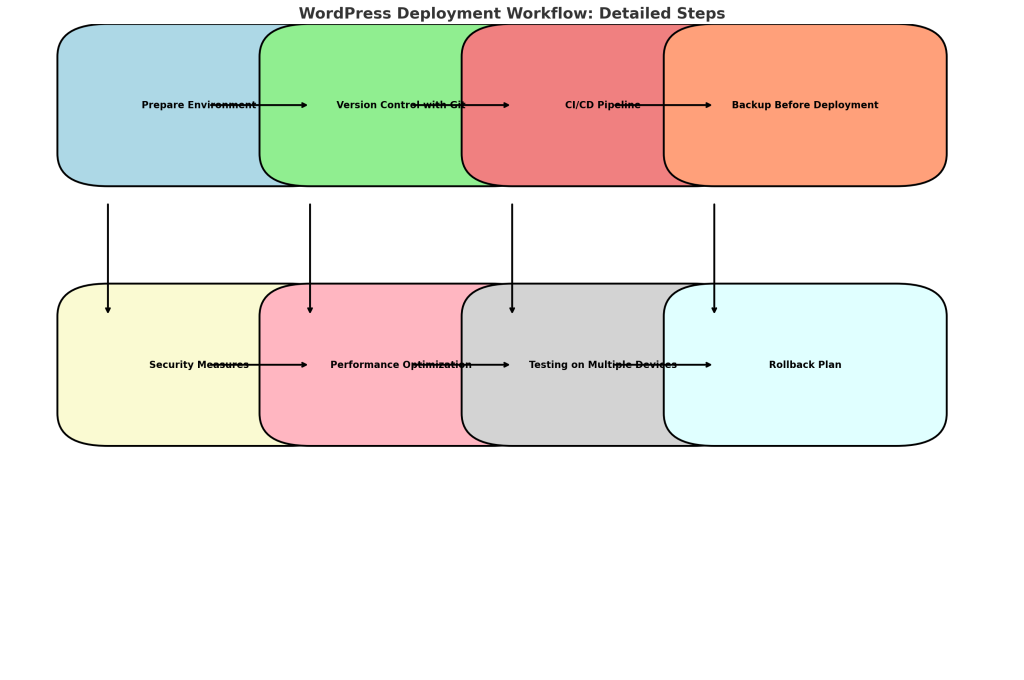
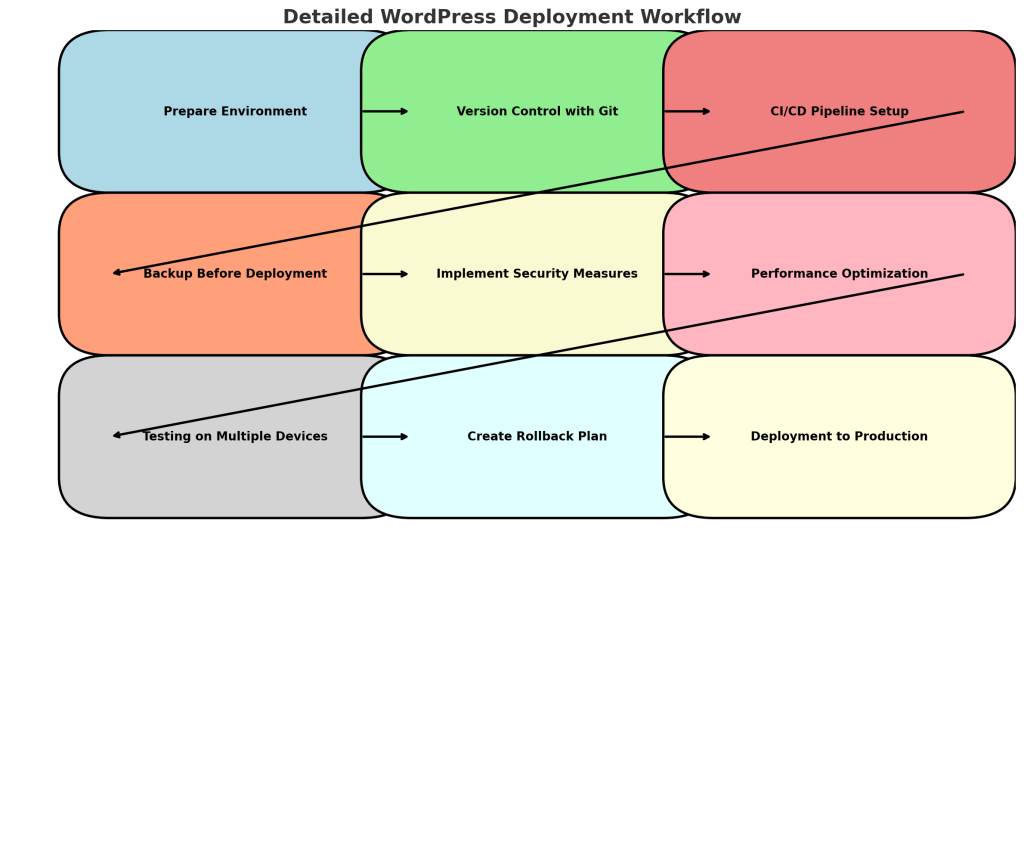
1. Prepare su entorno para el éxito
Antes de iniciar su despliegue, asegúrese de que dispone del entorno adecuado. Usted necesita dos configuraciones separadas para la puesta en escena y la producción. Nunca despliegue directamente desde su máquina local al entorno de producción, eso sólo le traerá problemas. En su lugar, utilice un servicio de alojamiento web fiable que le proporcione un entorno de ensayo.
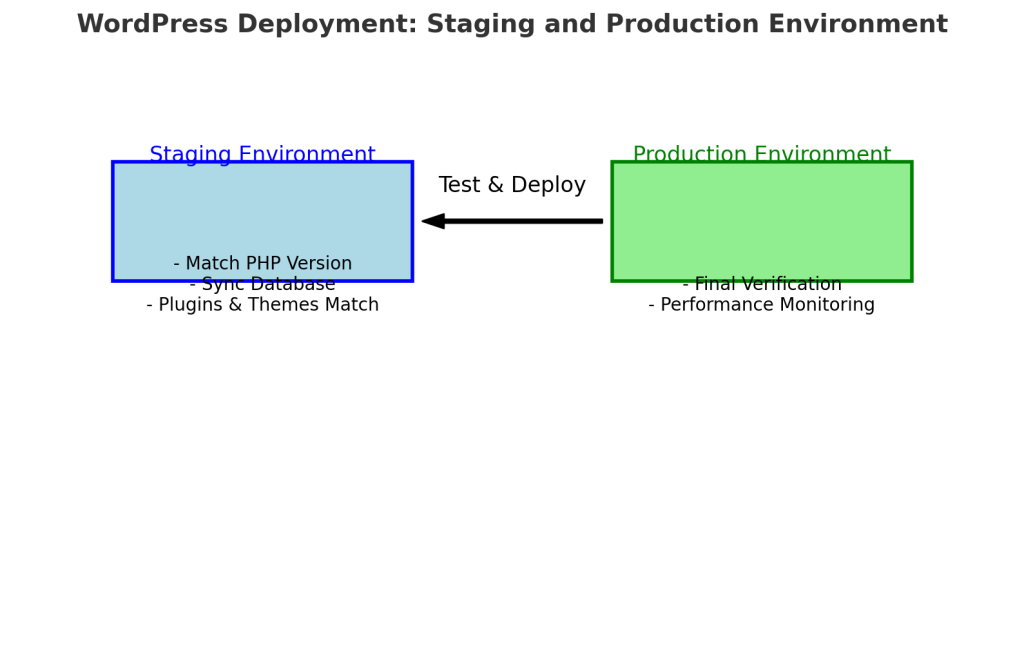
Acción: Configure un servidor de ensayo que refleje fielmente su entorno de producción. Esto significa:
- Versión PHP: Asegúrese de que ambos entornos utilizan la misma versión de PHP para evitar problemas de incompatibilidad. Pruebe la configuración de PHP, como los límites de memoria y los tiempos de ejecución, para asegurarse de que el servidor de ensayo coincide con el de producción.
- Configuración de la base de datos: Haga coincidir las versiones y configuraciones de las bases de datos para asegurarse de que los cambios o migraciones se reflejan con precisión en ambos entornos. Ejecute consultas en ambos entornos para verificar la compatibilidad y el rendimiento.
- Plugins y temas: Utilice versiones idénticas de plugins y temas en ambos entornos para evitar desajustes de funcionalidad. Pruebe a fondo las interacciones de los plugins y las funciones de los temas en staging.
- Configuración del servidor: Confirme que los ajustes a nivel de servidor, como las configuraciones de Nginx/Apache, los ajustes de almacenamiento en caché y las reglas de seguridad, son idénticos en ambos entornos para evitar sorpresas durante la implantación.
Tras configurar el servidor de ensayo, pruebe primero aquí los pasos de despliegue. Utilice herramientas de migración como WP Migrate DB Pro para sincronizar la base de datos sin pérdida de datos y realizar pruebas exhaustivas antes de desplegar a producción. Esto incluye probar todas las funcionalidades básicas, comprobar si hay errores de JavaScript y supervisar los tiempos de respuesta del servidor.
Si utiliza servicios como SiteGround o WP Engine, aproveche sus funciones de puesta en escena con un solo clic y considere la posibilidad de añadir scripts automatizados para sincronizar la configuración entre entornos. Implemente scripts para verificar automáticamente que los archivos de configuración, la base de datos y las cargas multimedia se sincronizan con precisión.
2. El control de versiones es su mejor amigo
Desplegar sin control de versiones es como caminar por el caos. Git es uno de los sistemas de control de versiones más populares, esencial para gestionar los cambios con eficacia. El control de versiones realiza un seguimiento de los cambios y le permite volver rápidamente a una versión estable si algo va mal durante la implantación.
Explicación de los fundamentos de Git:
- Sistema de control de versiones (VCS): Un sistema que registra los cambios realizados en un archivo o conjunto de archivos a lo largo del tiempo, para poder recuperar versiones específicas más adelante.
- GitFlow: Una estrategia de ramificación que ayuda a gestionar el desarrollo. Implica múltiples ramas como
característica,desarrolleyliberarpara mantener el código organizado. - CI/CD (integración continua/implantación continua): Automatizar la integración de los cambios de código de diferentes desarrolladores y desplegar estos cambios.
- Pelusa: Proceso de análisis del código para detectar errores de programación, fallos o errores estilísticos.
Acción: Integre Git en su flujo de trabajo de despliegue. Aquí tiene un enfoque detallado:
- Estrategia de sucursales: Utilice un modelo de rama principal/de desarrollo. Los desarrolladores crean ramas de características para cambios individuales y envían pull requests para su revisión. Las ramas de características permiten un desarrollo aislado sin afectar a la base de código principal.
- Comando: Utilice
git branch feature-nombre-de-ramapara crear una nueva rama. Utilicegit checkout nombre-de-ramapara cambiar a esta rama.
- Comando: Utilice
- Revisión del código: Asegúrese de que todos los cambios son revisados por pares antes de fusionarlos en la rama principal. Esto añade una capa adicional de control de calidad. Utilice herramientas de revisión de código como Solicitudes de extracción de GitHub o Bitbucket para facilitar las discusiones, poner de relieve posibles problemas y mantener la calidad del código.
- Comando: Utilice
git push origen feature-branch-namepara empujar su rama al repositorio remoto. A continuación, cree una pull request para su revisión.
- Comando: Utilice
- Etiquetado de comunicados: Etiquete sus versiones estables en Git para realizar un seguimiento de lo que se despliega en producción. Si surge un problema, puede volver fácilmente a una etiqueta anterior. Utilice esquemas de versionado como Versionado semántico (por ejemplo, v1.0.0) para indicar claramente el estado y los cambios de cada versión.
- Comando: Utilice
git tag -a v1.0.0 -m "Versión 1.0.0"para crear una etiqueta. Utilicegit push origen v1.0.0para enviar la etiqueta al repositorio remoto.
- Comando: Utilice
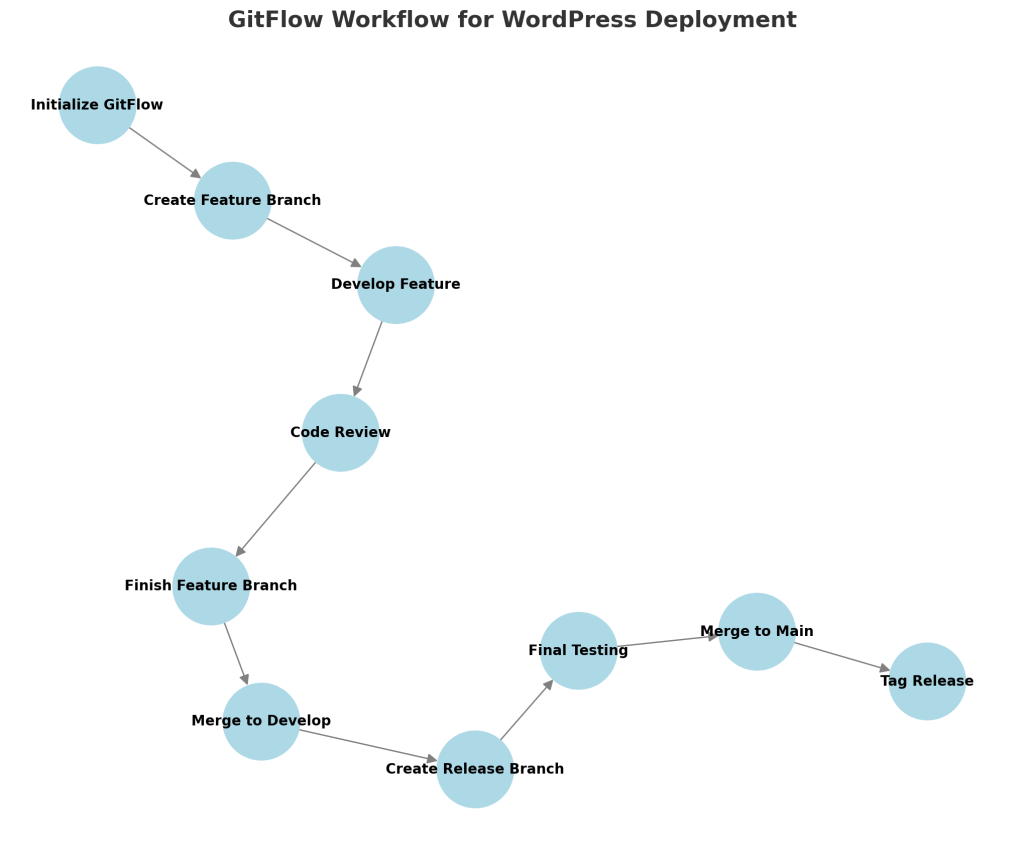
- GitFlow: Considere la posibilidad de utilizar GitFlow para gestionar mejor los grandes proyectos, especialmente si tiene varios desarrolladores trabajando en el mismo proyecto. Este modelo facilita la gestión de ramas de características, versiones y revisiones. Mantenga un rama de lanzamiento para las pruebas finales y correcciones antes de fusionar a la rama principal.
- Comandos:
- Inicializar GitFlow: Ejecute
git flow initen el directorio raíz de su repositorio. - Crear una rama de características: Ejecute
git flow feature start feature-name. - Terminar una función: Ejecute
git flow feature finish feature-namepara fusionarlo de nuevo con la rama de desarrollo.
- Inicializar GitFlow: Ejecute
- Comandos:
Además, servicios como Acciones de GitHub puede utilizarse para automatizar las pruebas y los despliegues tras las fusiones, garantizando que sólo el código validado llegue a producción. Automatice las comprobaciones de las fusiones, como las pruebas, el linting y las simulaciones de despliegue, para garantizar la estabilidad.
3. Utilice una canalización CI/CD para realizar actualizaciones sin problemas
Los despliegues manuales son propensos a errores. La implementación de una canalización de integración continua/despliegue continuo (CI/CD) puede automatizar el proceso, reduciendo los errores y aumentando la fiabilidad. De este modo, cada cambio se prueba y despliega sin problemas.
Acción: Establezca una tubería CI/CD que cubra:
- Pruebas automatizadas: Ejecute pruebas unitarias, pruebas de integración y pruebas de extremo a extremo automáticamente cada vez que se introduzca un nuevo cambio. Utilice herramientas como Jest o PHPUnit para realizar pruebas unitarias del código de WordPress. Configure pruebas de aceptación automatizadas utilizando herramientas como Selenio o Ciprés para validar los flujos e interacciones clave de los usuarios.
- Ejemplo de orden: Utilice
phpunitpara ejecutar pruebas unitarias PHP en su proyecto. En su configuración CI/CD, añadaphpunit --configuración phpunit.xmla la fase de prueba.
- Ejemplo de orden: Utilice
- Comprobaciones de validación: Incluya comprobaciones como pelusa para hacer cumplir las normas de codificación y análisis de seguridad herramientas como Snyk para identificar las vulnerabilidades en una fase temprana del ciclo de desarrollo. Establezca crear validaciones que impiden que la tubería continúe si las pruebas fallan.
- Ejemplo de orden: Ejecute
eslint .en la tubería para validar el código JavaScript.
- Ejemplo de orden: Ejecute
- Automatización de la implantación: Utilice herramientas como Acciones de GitHub, Pipelines de Bitbucketo Jenkins para automatizar el despliegue una vez superadas todas las pruebas. Cree un trabajo paso a paso que incluya la detención de servicios, la carga del código más reciente, la limpieza de cachés, la ejecución de migraciones de bases de datos y el reinicio de los servicios. Añada pasos de supervisión automatizados que validen la finalización satisfactoria del despliegue mediante la ejecución de comprobaciones de estado en el sitio activo.
- Ejemplo de acciones de GitHub:
- Sistema de notificación: Implemente un sistema de notificación utilizando herramientas como Slack, Microsoft Teamso correo electrónico para alertar a los desarrolladores de los éxitos, fracasos o problemas de construcción que requieren atención.

Al integrar una canalización CI/CD, minimiza riesgos como la falta de archivos o configuraciones incorrectas, y se asegura de que el despliegue de su sitio se realiza de forma coherente en todo momento.
4. Haga una copia de seguridad antes de implantar
Nunca, nunca despliegue cambios sin tener una copia de seguridad fiable. Una copia de seguridad es su red de seguridad si algo va mal, ya sea un conflicto de plugins, un error de código o un problema del servidor.

Acción: Implemente una estrategia de copia de seguridad de varios niveles:
- Copias de seguridad automatizadas: Utilice soluciones como UpdraftPlus, BackWPupo Jetpack para configurar copias de seguridad automatizadas. Configure estas herramientas para crear copias de seguridad antes de cada despliegue, almacenándolas de forma remota en plataformas como Google Drive, Dropbox o AWS S3.
- Verificación manual: Pruebe periódicamente el proceso de restauración. Cree un servidor de prueba y realice restauraciones completas del sitio para verificar que sus copias de seguridad están completas y no corrompidas. Programe simulacros periódicos de recuperación en caso de catástrofe para asegurarse de que el equipo está preparado para restaurar el sitio bajo presión.
- Base de datos y archivos: Haga copias de seguridad tanto de su base de datos como de sus archivos. Asegúrese de tener al menos una copia de seguridad completa reciente y copias de seguridad incrementales para minimizar la pérdida de datos. Implemente scripts automatizados para verificar la integridad de las copias de seguridad y envíe notificaciones si se detecta alguna discrepancia.
5. Mantenga la seguridad en primer plano
La implantación es un momento vulnerable para un sitio web: asegúrese de que no se pasa por alto la seguridad. Las contraseñas débiles, los ajustes predeterminados y los permisos de archivos inadecuados pueden dar lugar a situaciones comprometidas que afecten a la reputación de su marca y a los usuarios.

Acción: Asegure su proceso de despliegue con estos pasos:
- Cambiar los nombres de usuario predeterminados: Sustituya los nombres de usuario predeterminados como "admin" por otros únicos. Utilice herramientas como WP CLI para automatizar esto en varios entornos. Mantenga un registro de estos cambios en su documentación como referencia.
- Utilice contraseñas seguras: Genere contraseñas complejas utilizando una herramienta como LastPass o 1Contraseña y hacer cumplir autenticación de dos factores (2FA) para todos los usuarios administradores. Implemente comprobaciones automatizadas que hagan cumplir las normas de complejidad de las contraseñas en todas las cuentas de usuario.
- Permisos de archivos: Compruebe dos veces los permisos de los archivos antes de entrar en funcionamiento. Configure wp-config.php a 640 o 600, y evite configurar los directorios a 777. Ejecute scripts que validen los permisos de los archivos durante el despliegue para evitar errores de configuración.
- Archivos de configuración seguros: Proteja wp-config.php moviéndolo a un nivel de directorio superior (si su alojamiento lo permite) o añadiendo reglas en .htaccess para bloquear accesos no autorizados. Supervise los registros del servidor para detectar cualquier intento de acceso no autorizado.
- Instalar plugins de seguridad: Utilice plugins como Wordfence, Seguridad iThemeso Sucuri para añadir capas adicionales de protección, incluidos los análisis de malware y la protección contra la fuerza bruta. Actualice regularmente estos plugins y programe escaneos automáticos para mantener a raya las amenazas.
6. Optimice el rendimiento de su sitio web
Un rendimiento deficiente puede hacer o deshacer la experiencia del usuario desde el principio. Asegúrese de que su sitio está optimizado antes del despliegue para evitar costosos dolores de cabeza tras el lanzamiento. Puede utilizar soluciones de almacenamiento en caché y minimizar los scripts que bloquean la renderización para que todo funcione sin problemas.

Acción: Siga un plan de optimización exhaustivo:
- Almacenamiento en caché: Utilice plugins como Cohete WP, W3 Total Cacheo Caché LiteSpeed para el almacenamiento en caché de archivos estáticos y para reducir la carga del servidor. Verifique que su plugin de almacenamiento en caché está correctamente configurado en el entorno de staging antes del despliegue.
- Reducir los activos: Utilice plugins como Autoptimize para minificar archivos CSS, JavaScript y HTML. La minificación reduce el tamaño de los archivos y acelera los tiempos de carga. Pruebe el sitio después de la minificación para asegurarse de que no se rompe ningún script o estilo.
- Optimización de la imagen: Optimizar imágenes utilizando Smush, Imagifyo TinyPNG. Implemente carga perezosa para imágenes no críticas con el fin de mejorar la velocidad de carga percibida. Automatice la compresión de imágenes como parte de su canalización CI/CD para garantizar que todas las imágenes cargadas cumplen los estándares de rendimiento.
- Optimización de la base de datos: Limpie regularmente su base de datos utilizando herramientas como WP-Optimize para eliminar la sobrecarga y los datos no utilizados, garantizando que sus consultas se ejecuten con mayor rapidez. Programe las tareas automatizadas de optimización de la base de datos durante las horas de menor actividad para minimizar el impacto en el rendimiento.
- Integración CDN: Implemente un Red de distribución de contenidos (CDN) como Cloudflare o StackPath para distribuir su contenido globalmente, mejorando los tiempos de carga para los usuarios internacionales. Verifique la configuración de la CDN probando la entrega de contenidos desde distintas ubicaciones geográficas.
7. Pruebe a fondo en varios dispositivos
Lo que se ve muy bien en su portátil puede romperse por completo en un teléfono móvil. Las pruebas entre dispositivos deben formar parte de toda lista de comprobación de implantación. Asegúrese de que el sitio es receptivo y de que toda la funcionalidad funciona como se espera en los dispositivos móviles y de sobremesa..

Acción: Realice pruebas exhaustivas de los dispositivos:
- Pruebas entre navegadores: Utilice herramientas como BrowserStack o CrossBrowserTesting para validar la compatibilidad entre los distintos navegadores (Chrome, Safari, Firefox, Edge) y sus versiones. Pruebe diferentes resoluciones de pantalla e identifique cualquier problema de diseño receptivo.
- Dispositivos clave: Dé prioridad a las pruebas en dispositivos populares como iPhones (últimas versiones), iPads y los principales dispositivos Android (Samsung Galaxy, Google Pixel). Asegúrese de probar las orientaciones vertical y horizontal. Preste atención a los diferentes tamaños de pantalla para garantizar una experiencia coherente.
- Pruebas con usuarios reales: Más allá de las herramientas automatizadas, reúna a un grupo de usuarios reales para realizar pruebas en sus dispositivos. Céntrese en los flujos de usuario críticos, como registrarse, añadir artículos a un carrito o completar el envío de un formulario, y recopile comentarios para abordar los problemas. Utilice herramientas de análisis como Hotjar para observar cómo interactúan los usuarios reales con el sitio e identificar áreas de mejora.
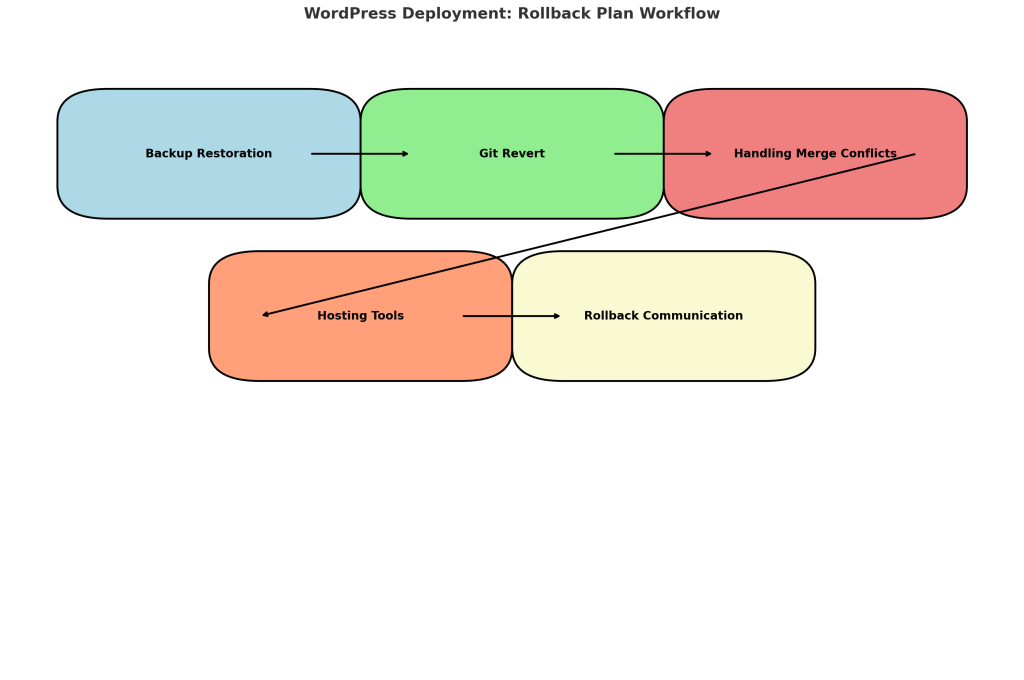
8. Tenga un plan de retirada
Nadie quiere pensar en el fracaso, pero ocurre. Un plan de reversión puede ayudarle a recuperarse rápidamente sin demasiado impacto en el negocio. Si algo va mal durante el despliegue, querrá tener la posibilidad de volver a la versión estable anterior.
Acción: Desarrolle un procedimiento detallado de desmantelamiento:
- Restauración de copias de seguridad: Tenga a mano sus últimas copias de seguridad y asegúrese de que puede restaurarlas rápidamente. Practique la restauración de las copias de seguridad en un entorno de prueba para minimizar el tiempo de inactividad durante una emergencia. Mantenga una lista de comprobación para cada tipo de restauración (base de datos, archivos, copia de seguridad completa) para agilizar el proceso.
- Revertir Git: Utilice Git para retroceder a una confirmación o etiqueta anterior. Aprenda a utilizar comandos como
git revertirpara deshacer commits específicos ogit resetpara mover el puntero de la rama a un commit anterior. Mantenga notas sobre qué commits fueron problemáticos y por qué, para evitar que se repitan los problemas.- Ejemplos de órdenes:
- Revertir un commit: Ejecute
git revertpara crear una nueva confirmación que deshaga los cambios realizados por una confirmación específica. - Restablecer el estado anterior: Ejecute
git reset --hardpara restablecer su rama a un estado anterior (utilícelo con precaución ya que puede descartar los cambios).
- Revertir un commit: Ejecute
- Ejemplos de órdenes:
- Manejo de conflictos de fusión: Al retroceder o fusionar, pueden surgir conflictos. Manéjelos revisando cuidadosamente cada sección conflictiva y eligiendo la versión entrante o la actual.
- Ejemplo de orden: Utilice
git mergetoolpara resolver conflictos de forma interactiva, o edite manualmente los archivos en conflicto y marque los conflictos como resueltos utilizandogit add.
- Ejemplo de orden: Utilice
- Herramientas de alojamiento: Si su proveedor de alojamiento ofrece instantáneas o restauraciones instantáneas (como Kinsta o Motor WP), asegúrese de que sabe cómo iniciarlas rápidamente. Documente los pasos necesarios para que cualquier persona de su equipo pueda encargarse de una restauración en caso necesario. Programe sesiones de formación periódicas para que el equipo practique la iniciación de estas restauraciones.
- Comunicación de retroceso: Cree un plan de comunicación para las partes interesadas y los usuarios en caso de retroceso, explicando el tiempo de inactividad y el tiempo de recuperación previsto. Redacte con antelación plantillas para la comunicación por correo electrónico y redes sociales a fin de reducir los tiempos de respuesta durante un incidente.
Conclusión
La implantación de WordPress puede ser un proceso fluido y casi predecible si sigue estas prácticas recomendadas. Desde la preparación de su entorno y el uso del control de versiones hasta la automatización de las implantaciones y el mantenimiento de las copias de seguridad, cada paso ayuda a mitigar los errores más comunes y garantiza el éxito del lanzamiento de su sitio web. Implementar un sistema de control de versiones bien estructurado es crucial para mantener un flujo de trabajo coherente y fiable.


That’s good.